Showing posts with label halloween. Show all posts

Friday, October 26, 2012

Outdoor Halloween Decorating

Halloween is my FAVORITE holiday.  I drag my husband outside every year, and we decorate the yard.  So, here are a few of my decorations.  Some of them I got from Pinterest, others were our own thrift store creations, and others my own ideas.

This idea came from a great picture I found on Pinterest of a ghost circle.  I had one last year with wooden dowels, but the rain bent them.  This time I used 2 foot rebar and it's so much better.  I used lunch sack's stuffed with the sheets from last year's ghost circle. Then I used clear duct tape and cut plastic drop cloths.  Next, I used two sets of our old orange Halloween lights as the fire.  I love how it looks like glowing embers at night, and it's a great way to creep my neighbors out.  My husband put one of our broken skeleton's head as the centerpiece.

I spent about $12.50 for the rebar and a 3 pack of plastic drop cloths.  Everything else I had at home. 


Uploaded from the Photobucket iPhone App

E626D34D-9FE9-4DB8-9184-E60301795377-16374-00000E600066FB85

This is our thrift store find.  We found a brand new spider web, spider, and a two pack of barbie dolls (though this one is technically Midge).  I wrapped her like a mummy in yarn, and we made the sign.  This one is over one set of windows.  We live on a corner lot, so I have a second one up now on another part of the house with another barbie who is completely wrapped up, even her head with another spider, but it wasn't up yet while I was taking pictures. 

 Uploaded from the Photobucket iPhone App

Next is our tree ghosts.  This is a composite of several ideas I've seen on Pinterest and other blogs.  These are cheesecloth and paper lantern ghosts.  I bought two packages of the rolls of cheesecloth in the Halloween section at Walmart.  I think they were less than $3-4/ea.  It was 6 yds x 36 inches wide.  I purchased a 3 pack of white paper lanterns from Hobby Lobby for $4.99.  They are in the party decoration area.  Then, I used our battery operated flickering tea lights (the ones for your jack o'lanterns).  You can get a 2 pack of those with extra batteries for about $2.99. 

First, I cut out ghost eyes and mouths from duct tape and stuck them on each lantern.  I used purple because my children's rainbow of duct tape colors was conveniently missing the black.  Then, I cut varying lengths of the cheesecloth (around 2 yds each) and threaded it over the hook on the top of the paper lanterns.  I had enough to do 2 layers on each ghost, to give it a ripped up look.  Then I taped up the bottom of each lantern so the tea light would not fall out.

Uploaded from the Photobucket iPhone App

I love the way they blow with the wind and flicker at night.  They came out better than I expected.  And, even in a torrential rainstorm, they came out perfectly fine.


Uploaded from the Photobucket iPhone App


These are some of our decorations.  I have other regular ol' decorations like lights around trees, light up bats, the messy spider webs with giant spiders coming off our garage lights, etc.  You can find some great cheap stuff at thrift stores in Aug/Sept before Halloween.  I get practically new decorations for cheap, like my latest zombie bride door hanging that was probably $10 or more in a store, I paid 1.99.

We also have various small 3-ft skeletons climbing our house.  Those we put up with clear duct tape.  If you open the daylight paper lantern ghosts picture, you'll see on our skeletons climbing up the house. These were purchased at Target for $9.99/ea I think? I can't remember the price.

Oh! I found a picture of the one climbing the street lamp  in our yard.

78F1049B-63F6-486A-AE1D-30AF658CB81D-16374-00000E600F714729

I do have some special decorations that are "one night only" that will go up on Halloween.  I'll take pictures of those and share next week.

Saturday, October 23, 2010

Halloween 2010


We went to Mr E's Fall Festival tonight, so costumes had to be done a week early - during my midterms, when I also have an 8-10 page paper due next week, not to mention the neighborhood wide garage sale I signed up for next Saturday - plus my stupid professors are still requiring us to post our regular ol' homework (WTF?).  AAAAAHHHH!!

Here is a silly pic of Mr. E attempting to eat a donut on a string.  He got icing literally up his nose and in his eyeballs, but he won!

This year my only real costume to make was Miss Em's.  She informed me last week she wanted to be a 1950s car hop, complete with roller skates (thank goodness we already have those). Mollyball is going as a spider - a super easy costume I made for Mr E for his first Halloween.  We are debating on calling her Charlotte or Aragog.  In lieu of my husband's love for all that is Harry Potter, I think we are going with Aragog.

You can't really see her costume (I'll take a better pic tomorrow), but this is such a cute pic of her and daddy I had to share.  For the baby spider costume you can easily make this in a couple hours with a serger.  Make a black interlock hoodie from your favorite hoodie/sweatshirt pattern.  Before you sew up the side seams, make 4 tubes stuffed with fiberfill the same length as arms and put two under each arm, sewing them in the side seam.  Then in about 3 locations, take black embroidery thread and run it through to connect the 2 fake legs with the arm hole for stability.  Then make a matching pair of sweatpants. Voila - baby spider!

Now for Miss Em's Car Hop costume.  I had so much fun with this, and used no patterns (um, well I used a pattern I made for the hat, but other than that - no patterns).  I didn't make the shirt.  We used one of her old t-shirts that was almost too short, and I ironed an "E" on the shoulder.

Her skirt is a simple circle skirt.  I added a ribknit waistband just to finish it easy.  I also trimmed the hem in a pink polka dot grosgrain ribbon.  The petticoat, which there is not a picture available yet, is a layered skirt.  It consists of a rib knit waistband, a 3 inch woven layer, than a 6 inch layer of nylon tulle and another 6 inch layer nylon tulle.  The outer layers of tulle are the scratchy stiff stuff - they really add bulk to make it poof.  The top tulle layer is three strips sewn together of the stiff tulle, gathered - each strip is  6 inches x the width of the fabric.  The bottom tulle layer is twelve strips sewn together of the stiff tulle - same measurements.  Then, I did the exact same thing with the softer tulle under those and attached.  Then the side seam was sewn together, and finally the knit waistband was attached.

The apron was next.  I basically cut a rounded half apron shape, then cut several strips 4 inches wide x width of fabric and folded over and made a ruffle, then attached it.  Next, I wanted straps big enough for a decent sized bow.  I cut straps 3 inches x the length of fabric, attached and then topstitched along top edge of apron. 

From other 1950s car hop aprons, I saw examples that had all kinds of things like poodles to "'50s" appliqued on one edge, but I thought a cupcake was cute and was sort of carhop-y.  So I drew my own applique, sewed it, then blinged it with hotfix crystals, and finally ironed on the "E" to complete it. 

Next, we needed a name tag.  This is super easy.  I cut a square of the "icing" fabric from the cupcake and used pinking shears.  Then folded it as above, added a couple dots of hot glue to keep it that way.  Next I made the name tag out of foam and foam letters, and added embellishments, then hot glued a pin backing, and attacked the whole thing to the shirt.  (That adorable ribbon flower embellishment was found in a 2 pack at Joanns near the trims and ribbons.  They had all kinds including adorable pink ribbon elephants - so cute!)

The thing that scared me the most was the pillbox style hat.  I used this wonderful Threadbanger tutorial and pattern.  I made mine backwards because I sort of wanted a cross between a pillbox and garrison cap to give it a waitress-y feel.  Surprisingly, it was very very easy, and came out exactly as it should.  I was down to the wire on this one.  I had one chance and 30 minutes before it was time to pick up kidlets from school.  It was so much fun, I'm tempted to make one myself just to wear (hubby has a thing for women and hats, lol).  They are super fun to embellish too.  I punched holes in either side and attacked clips to Miss Em's hair.  For the hat embellishment I made a tiny pinking sheared square, folded it, hot glued it, and added the ribbon embellishment and one last sparkly foam "E."

Total cost of car hop was  probably $20 for embellishments, fabric for skirt and hat, and tulle.  Everything else I already had in my stash.  

Later this week I will get a picture of all 3 together.  Mr. E was a home grown Jedi with white t-shirt, black sweatpants and last year's mama-sewn Harry Potter robe (He was Draco), topped off with a belt and a lightsaber.

Wednesday, October 10, 2007

It's Halloween time!!!

I know, I know, I've been missing with my fun-filled posts too. I had a lot on my plate so I decided to say the hell with the internet for a little while. But I actually got caught up on stuff. I'm caught up on my school work and have created a plan to do most of it on the weekends, so now I'm totally whizzing through it. It's great - heck, I might be done and graduated by the end of the year!! So I'm making a big effort to post more from now on. So much has happened in the last couple weeks, I have to share, but I'll do it through several posts.

So....it's Halloween....my favorite time of the year. I wish it was like a week long holiday or more than just once a year. I would take Halloween over Xmas any day, lol. I love to make costumes and decorate the front yard. And don't you just love the Nightmare before Christmas?? And who doesn't love trick or treating. Thank goodness I have kids, lol. So Em is going with 50s girl with a poodle skirt, and I have found this great link to make one, Poodle Skirt How To. And just and FYI to anybody else, Joann's is having a sale on 72 inch felt for only $2.99/yd. I'm going this week to find some bubblegum pink.

I need to make a crinoline to go under it this weekend, and I'm going to try to remember to do it with the camera and put up a tutorial for it. You can never find a petticoat tutorial when you need one, or so I discovered awhile back when I needed one for a particular outfit for Em. And they are fairly easy to make.

And on a completely unrelated note....how 'bout them Cowboys?? I can't believe we are 5-0!!! We are Dallas Cowboy fans in this house. In fact my husband hated them until he married me, lol. My dad is a Cowboy's freak and my husband and dad love nothing more than falling asleep in recliners at my parents' house watching the Cowboy game on Sundays. Seriously, outside of the office, he ONLY wears Dallas Cowboy t-shirts. I'm not kidding. He's a freak. I am probably the one who keeps him in the shirts as I give him 2 of them every birthday and Xmas. But he's been a loyal fan since the beginning. I grew up with life revolving around football season and during football season, life revolved around what time the Cowboys played on Sundays, lol. He and his dad had season tickets back when they played at the Cotton Bowl many, many years ago. And....my son's middle name is Landry for my father's love of Tom Landry and the Dallas Cowboy's, lol. Heck, when we finally have baby #3 and if it's a boy, it might end up with the name Emmitt. We have an "E" thing going with our kids names, they all start with E, so #3 will have an E name too, lol.

Saturday, September 15, 2007

Pumpkin Spiders are HERE!!

Sorry for the delay, but I had to go on a scavenger hunt through 8 Target stores looking for a navy blue knit skort for Ms. Em. She has joined the newly formed pep squad at school (kinda of a cheerleaders/drill team all in one, as they cheer and perform dances), and this was to be part of their uniform. Let me tell ya, 8 Targets, the last one was going to be the last one whether they had it or not and she was just going skortless, lol, but magically, they had 1 in her size.

PUMPKIN SPIDERS ARE HERE!!Okay, okay, but on with the Pumpkin Spiders! The pattern is now available for instant download. I think I said this earlier, but I can't remember -- it is recommended for advanced beginners and up. And it's great for boys or girls. In fact, I've actually made 1 pair for a client that was made to be shared between a boy and girl set of twins, and the client asked me to make detachable ruffles. So I did! It was very cool!

There will be more applique patterns coming soon. I haven't quite decided if I'm going to offer another Halloween style. A Christmas design will be up by the end of the month.

For a discount, look through the blog here and find a post with a little Chick, if you roll your mouse over it (don't click it) and the secret code will pop up at you.

Pumpkin Spiders are coming this weekend!!


The first pattern in our series of applique designs to create boutique embellished overalls is coming out today!! Yay!! Now you can make your very own pumpkin spider embellished overalls for Halloween!! This is recommended for an advanced beginner or slightly intermediate seamstress because of the curves to the appliques. Curves are the hardest thing to applique.

I'm in the middle of turning it into a downloadable and uploading it to the shopping cart today. It will be available late this afternoon. And you can use the hidden chickie discount on the pattern too!

Monday, September 10, 2007

Waldorf Doll Sew-A-Long

Just a short little update today. I have updated the jointed waldorf doll sewalong. It now has a downlodable PDF pattern for the body and arms and legs and the missing pictures are up again.

It's under the "FREEBIES" on the left or for the lazy people, here is the link:

Jointed Waldorf Doll Sew-a-Long

Also, I'm finished with the Halloween pattern for the embellished overalls. It just needs to be all put together and should be available at the end of the week.

Wednesday, October 18, 2006

Halloween Projects - Make Your Own Devil Horns

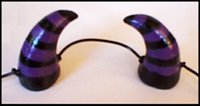
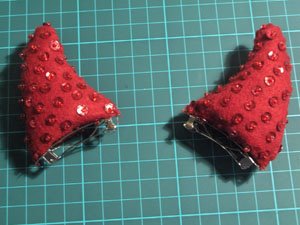
So I thought this was cool, these make your own horns directions, I found two, one is fabric and one is Sculpey.

The Sculpey Version


I'm definitely making myself a pair of pink glitter twisty ones. Nothing says weirdo like wearing pink twisty glitter horns on an everyday basis.

The Fabric Version


Miss Em has informed she is no longer going to be a pirate, but she's going to be a devil, so I'm thinking these horns will do it for her. I love the neat idea of having hair clips on each one, very good idea.

I'll post more how to's later, I'm being summoned to work to clear an account tonight.