Showing posts with label tutorial. Show all posts

Wednesday, January 23, 2013

Sock Baby Dolls

F20BD94C-83DC-4F1C-82D9-942D4D27E458-144-00000003C91ED776 photo F20BD94C-83DC-4F1C-82D9-942D4D27E458-144-00000003C91ED776-1_zpse96e38e7.jpg

My darling 13 year old cleaned out her room awhile back and got rid of an entire grocery sack of socks stuffed full. Some of them she hadn't even worn.  Children of the 21st century.  I feel the need to explain to her that just 100 years ago people were darning their only pair of socks.  Not only their ONLY pair of socks, they were also more than likely hand knitted by their mother and/or sisters.  

I digress.  I've been reading way TOO many dystopian teen novels lately.  

I wasn't going to wear them and neither was anyone else in the house.  I decided it was best to upcycle them into something crafty.  

Luckily for you guys, I happened to remember my phone nearby and took pictures of the process so you too can make these little sock babies.  Here is the tutorial in pictures, pretty self explanatory.  Have fun!

  photo A112768B-C011-474A-91AC-47B319CBB2C8-3735-000002B6AAF7D0CD.jpg

 photo 34D7B9B0-A562-4765-A14F-0FAB8DAE2DEE-3735-000002B6AE427B53.jpg

 photo B89DD530-56A8-4D2C-A716-EFE94467C393-3735-000002B6B17E4DA8.jpg

 photo 299C3F82-01A1-47C2-89BA-D1D9694E3395-3735-000002B6B4B7E23F.jpg

 photo 099B170F-6CEE-42B6-9A4A-74153D96975B-3735-000002B6C361F2B1.jpg

 photo A907865D-1658-4E24-8115-F3E97462FE95-3735-000002B6D4F1C6A2.jpg

 photo 0A03E597-0A4B-451B-A96F-C6D5FCB69390-3735-000002B6D07F45BD.jpg

 photo C0C9365F-B7B3-45A4-B9E3-9D14578B3834-3735-000002B6CAD67668.jpg

 photo A8BA888E-1D30-4A71-9AFE-9A5B53991D16-3735-000002B6D7ED6C21.jpg

 photo 78FBBA88-4AC9-49D0-AF97-A9B014FD6526-3735-000002B6DAB5BA73.jpg


 photo 0B0D8E4C-2383-455E-851A-6657BB1C4FFF-3735-000002B6E305C093.jpg

 photo 3A237A9C-0B46-447C-A7B1-02D447E73199-3735-000002B6F1AF0A68.jpg

 photo A14A1A67-B69C-44FB-B9EA-70A974D54D17-3735-000002B6E6158B5A.jpg

 photo 315D8A2D-1086-4BF3-9B86-B78CAC388C29-3735-000002B6DEA428A3.jpg

  photo 81667130-3E2E-423E-87B4-7983B3CCBC76-3735-000002B6EEF2D33D.jpg

 photo C1E0D7FD-BB4D-43AB-A353-4C54F1F98914-3735-000002B6F7E5473F.jpg

 photo BBA55FC8-A97A-4753-A6DA-E5F850F21007-3735-000002F1A6327F07.jpg

  photo D9599365-7F82-40FC-AA6B-22E0A668D226-3735-000002F1F08A2913.jpg


  photo F8A9C3F8-23D2-4E42-84B2-5A3F250F9603-3735-000002F243F4301A.jpg

 photo 0D00235B-3D4B-49BA-9853-6DB0D1D6A853-3735-000002B6FCF31EDA.jpg

This last step I was worried would be hard to understand in just pictures, so here is a little explanation.  After you make the little round arms and legs.  Cut off as much excess of the end of the arm/leg.  Next, place the arm/leg where you are to sew it with raw side facing the body.  Then, squish it into the body (as my finger is doing in the picture) so that you can whip stitch it against the body while hiding the raw edge.  Make sense? I hope so.  I'm not sure how else to explain. 

05535E4A-A77C-4B6C-9198-8B33E416D703-144-00000003CC00A334 photo 05535E4A-A77C-4B6C-9198-8B33E416D703-144-00000003CC00A334-1_zpsa39dcc46.jpg

Done in one episode of Fringe!

I got this idea in my head to make these little dolls. I even added arms and legs.  What does everyone in this house say? They look like snowmen.  No, no, no.  They have arms not made of sticks.  They have legs.  These are not snowmen.  My dear husband says it's the hat.  Did Frosty switch to a ski style hat instead of a black top hat in his last Xmas special?  Whatever.  Enjoy!!

AF963085-D83E-4CFF-BE3D-D13DB505E239-3735-000002B5A5627A4F photo AF963085-D83E-4CFF-BE3D-D13DB505E239-3735-000002B5A5627A4F-1_zpsfcf429d8.jpg

Monday, January 14, 2013

Preschooler Busy Bags

A long, long, time ago, in a galaxy far away I was a member of this cool website called Swap Bot.  When I left my husband I completely forgot about it.  I had no access to my former email and with all the things going on, it just slipped away.  I came across it recently again and decided I'd give it another try.  I signed up for a Preschool Busy Bag swap.

3CF0D2DF-D9FA-47BD-B104-0FD8AEFFA260-7098-0000040F69EEB714Busy bags are basically ziplock bags of fun for your child, that have everything in the bag to do the activity.  Prior to the swap, I had never heard of these and had to google them. They looked like so much fun, I decided to join the swap. I go volunteer at Mr E's school and I always bring a bag of fun stuff for Miss Molly.  I thought busy bags would be extra fun for her to play with while I'm doing projects or copies for the teachers.

Our theme for the bags was "winter," but I found this wonderful little cupcake busy bag instructions at Money Saving Mom's blog.  To keep it winter, I tried to stick with "winter" colors like blues and whites and sparkly felt.

If you want to make your own, it costs little of nothing.  Hobby Lobby has felt sheets for 4 for $1, 4 is enough for one busy bag, plus raid your own pantry for a large ziplock and a couple of small ziplock bags for the sprinkles and big toppings.  I added a glue stick to each bag, but these can easily be done without glue sticks so you can use them over and over.  Then print off the instructions from the link above and create your own.

0FA74F3E-E45E-48BF-A20A-863E7A65030A-7098-0000040F77A56BEE-1_zpsdfe22fe4

Sunday, December 23, 2012

American Girl Mermaid Tail Sewing Pattern


 The downloadable pattern has finally arrived!  And, it's only $4!  Please head on over to Etsy or Craftsy to download your very own copy.  The pattern is completely digital, which means you print it right from your computer and can get to work as soon as you want!

Click here for Etsy
Click here for Craftsy

You can whip up 2-3 mermaid costume sets with just 1/2 yard of a four-way stretch dancewear fabric.

This is a great last minute gift you can whip up in an afternoon for the little girl in your life who loves American Girl. This is an easy to make tutorial for a mermaid tail and bandeau style top for your American Girl or similar 18 inch doll. It also fit my 18 inch Waldorf style dolls.

Recommended fabrics: dancewear fabrics, four-way stretch lycra and spandex knits.

Uploaded from the Photobucket iPhone App

Sunday, October 21, 2012

Part 3 - DARTH VADER of the Star Wars Ribbon Sculpture Tutorial

This is Part 3 of my Star Wars Ribbon Sculpture tutorial. This tutorial will show you how to make a Darth Vader ribbon sculpture hair decoration. I have it pictured both on a hair clip and on a headband, so you can see which you like better.

As in my previous posts, I've seen tutorials that tell you to use that fray spray, but I don't like it. I prefer to seal my ribbon edges with FIRE!  Since I've started this tutorial, I purchased a woodburning tool (with my 50% off coupon!!) from one of the craft stores, and it works great.  You just barely run the edge of the tool along the raw edge and it seals easily and quickly.

Darth Vader Ribbon Sculpture Hair Clip / Headband Tutorial

Materials: 
Hot glue gun or fillet tape
Scissors
Lighter or wood burning tool to seal edges
Ribbons: 
  •    Black 3/8 inch:  1 piece of 3.5 in, 2 pieces 5/8 in./ea, 4 pieces of 1.25 in, 1 piece 5.5 in
  •    Black 5/8 inch:2 pieces 2 in, 4 pieces 2.5 in
  •    Gray 3/8 inch:1 piece 1 in, 1 piece .75 in, 1 piece 1.5 in
  •    Red 3/8 inch: 2.25 inch
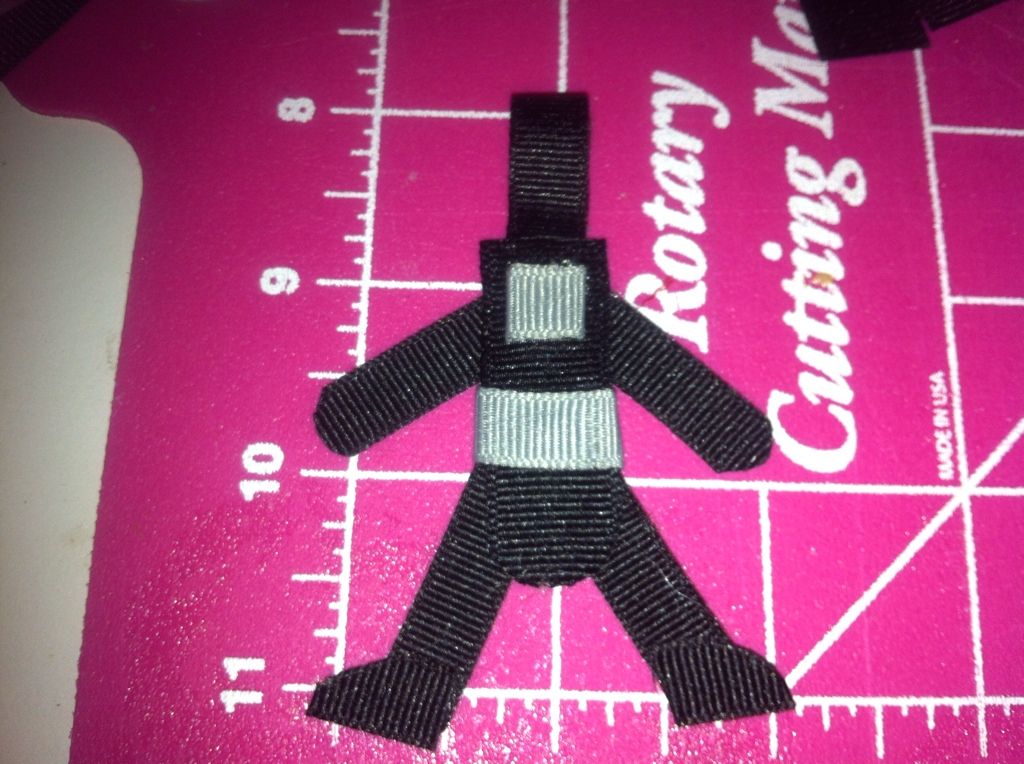
 Step 1 - Take the 3.5 inch black 3/8 inch ribbon and roll the top into the head and glue.

Step 2 - Create the feet and legs.  First, round the edges and seal the two 3/8 inch ribbons that are 5/8 inch in length.  Then glue them onto the end of two pieces of the 1.25 in pieces of 3/8 inch ribbon to form legs as shown. 

 Uploaded from the Photobucket iPhone App 

Step 3 - Glue the legs onto the body as shown. 

 D6B69F3B-2AB4-4AFB-8B88-009B5887DB85-12646-00000AA12B9AF989 

Step 4 - Take the other two pieces of 1.25 in back ribbons and round the edges of the arms and seal, then glue them to the body as shown.

 Uploaded from the Photobucket iPhone App 

Step 5 - Take one of the 2 inch pieces of 5/8 in black ribbon, round the lower part of the body, then seal the edge. 

 Uploaded from the Photobucket iPhone App

Step 6 - Glue the body onto the top of the body as shown.  I glue this up clear up to the head.


Step 7 -  Take the 1 inch piece of gray ribbon, fold it over and glue it into a square.  Glue it to the upper body of Darth Vader.

 3480B439-4F83-4F97-B9BB-27073FE5D76D-13407-00000BA0AE278D4C

Step 8 - Take the 1.5 inch gray ribbon and glue it around Darth's waist for his belt.

Uploaded from the Photobucket iPhone App

Step 9 - Take the four 5/8 inch width ribbons that are 2.5 inches long and glue together as shown to create the cape.  Measure it to the back of Darth Vader so that it will be short enough to glue at his neck, but also show his feet.  Then, round the edges and seal at the bottom as shown. 

 Uploaded from the Photobucket iPhone App 

Step 10 - Round and seal the top of the cape as shown.

Uploaded from the Photobucket iPhone App

Step 11 - Attach the cape at the center of Darth's neck.

1C502BEB-8114-436A-A535-EAAFAC56BA1E-13407-00000BA0907AF88C

Step 12 - Create the front of Darth Vader's cape with the 5.5 inch piece of 3/8 inch black ribbon.  Fold over the middle on both sides and glue as shown in the picture, so that it will fit behind his head and be at the top of the cape.

Uploaded from the Photobucket iPhone App

Step 13 - Glue the top middle of the ribbon to the back of Darth's head and bring the long pieces down in front.  Glue them at various points along the arms and legs to keep in place.  Cut the ribbons to the length of the back cape and seal the edges.

3AA3612F-CE6B-4A91-A4B4-FC5EB52F6C25-13407-00000BA0614B37AA

Step 14 - The tricky part.  Take the second 2 inch piece of 5/8 inch ribbon and measure the helmet ribbon around his head and make sure it will be just long enough to right past his head before you cut it and seal it.  Fold in half to mark the middle, then glue the middle to the top of his head (just slightly forward).  Apply glue to the edge of the rounded part of the cape at the neck on one side, just the forward facing edge.  Then, glue the side of the back of the helmet ribbon to that part.  Do this for both sides.  Leave the front of the ribbon unglued.  It gives him a "king tut" look, but it also gives it that look of the Darth Vader helmet.

FAFFA9C6-FFFF-4B97-9BD2-6EEBEE35F626-13407-00000BA02297F79C

Step 15 - Make the light saber.  Cut the edge off along the length of the .75 inch gray ribbon.  Seal this edge.  Cut the red ribbon along it's length into the shape of a light saber. I  start out the width of the gray part and cut it down to a rounded point.  Seal all the edges.  Glue the red ribbon behind the gray. 


9C51490D-9C1E-432B-93E9-172381F02F86-13407-00000B9D9DA32C1B

Step 16 -- Glue the light saber to the hand and along the body.  And you're finished!

A7F14DBE-DDB1-4EA2-97AC-C2824EBB3CF8-13407-00000BA041E7C2BC

Attach to a clip or headband. 

1A522D72-44DA-4292-ADC5-070C1A900DC5-12646-00000AA0932277CE

And this completes the Star Wars Trilogy ribbon sculpture.  I will have a new one for another popular trilogy coming soon.  Thanks!
Mondays @ All Things Fee!

Tuesday, October 09, 2012

Yoda Star Wars Ribbon Sculpture Hair Clip Headband Tutorial

838A1599-C7F9-47E0-AACF-3604CC891DED-6399-00000513116CD19AWell, believe it or not, I did make time for some blogging.  While making some things for my new booth space, I decided to whip up a 3 part tutorial on some of my favorite "nerd girl" ribbon sculptures.  This is part 1.  There are 2 more parts coming this week from the Star Wars theme.  And no, even though my children have begged, one of them is not going to be Jabba the Hut.  

This tutorial is to make a Yoda ribbon sculpture.  I have it pictured both on a hair clip and on a headband, and both look adorable.

I've seen tutorials that tell you to use that fray spray, but I don't like it.  I prefer to seal my ribbon edges with FIRE!  I usually just light a candle and run my edges close to it to seal them.  I'm not good with holding a lighter.  I plan to get a wood burning tool very soon to try that method.

Yoda Ribbon Sculpture Hair Clip / Headband Tutorial


Materials: 
Hot glue gun or fillet tape
Scissors
Lighter or woodburning tool to seal edges
Ribbons:
Light green (almost a pistachio color):
    1 piece 3.5 in, 1 piece 1.25 in, 4 pieces 1.1 in/ea
Dark Brown:
    1 piece 2.25 in, 1 piece 1.5 in
White:
    1 piece 5 in, 2 pieces 1 in/ea

1.  Take 3.5 inch green piece and roll top into head and secure with hot glue. 

Uploaded from the Photobucket iPhone App

2.  Take the 1.5 inch green piece, heat seal the ends, and create the ears.  Glue each end down as shown.

Uploaded from the Photobucket iPhone App

3.  Insert ears into the head loop and glue to the inside back of the head loop.

4.  Take all four of the green 1.1 inch pieces and round one edge of each one.  Then heat seal and glue them as the arms and legs.  Keep the legs fairly close together as shown.

Uploaded from the Photobucket iPhone App

5.  Take the two 1 inch white pieces and cut one end at a diagonal.  Heal seal those edges and glue to the arms for sleeves.


6.  Take the 2.25 inch brown piece, heat seal the edges, and glue down the length of the body.  I like to roll the head piece up a tiny bit and insert it right under it.  If it's too long at the legs, cut it so the legs will shown, like this example. Take the 1.5 inch brown piece and glue it wrapped around to create a waist.


7.  Create the robe.  Take the 5 inch long white ribbon and find the middle of it.  Glue the down the sides as shown in the picture.  Leave an opening to go around the "neck" Yoda that is 3/8 inch wide.  I just eyeball it and try it on Yoda before I glue it down.


8.  Heat seal the edges of the robe, then wrap it around Yoda's neck, glue it down at the arms, and at the edges of the legs that are next to the brown ribbon.  Then you are done with Yoda.  

Uploaded from the Photobucket iPhone App

Attach to a ribbon covered alligator clip or a ribbon wrapped headband with fillet tape or hot glue.

**If you want to add a little embellishment, dip a toothpick 1/3rd in black paint and 2/3rd in green paint.  Allow to dry, then hot glue into his hand for a light saber.  When I write up the PDF version of this tutorial, I will include pictures of this embellishment as well.

Enjoy!

5E0C58EF-054F-4EB6-983D-6EA88FFCF9D2-6399-000005135CE93F37


”Tip