Showing posts with label bread. Show all posts

Sunday, February 03, 2013

French Toast Casserole with Strawberries and Cream Cheese

The flu has hit our house, so I've been up to my eyeballs in taking care of everyone.  I have 3 to 4 tutorials all about 75% ready for you guys. I think everyone is on the mend (crossing fingers!) so that I can get back to posting some new tutes very soon in the next week or so.

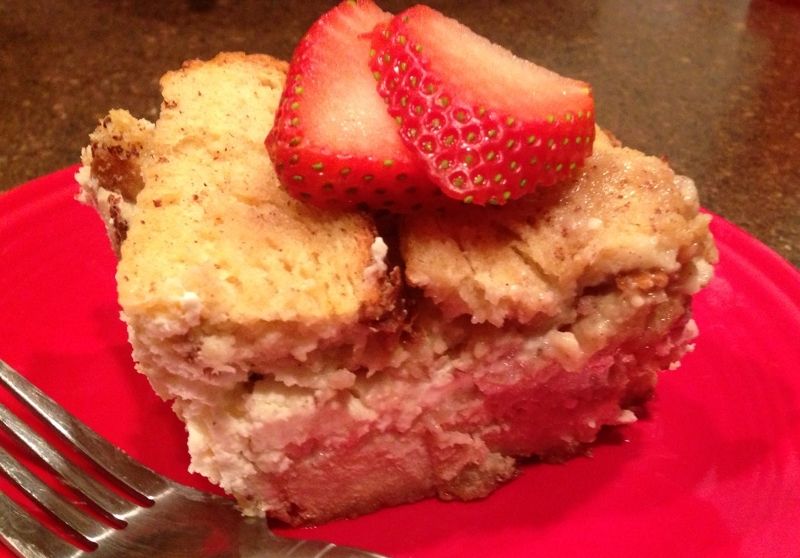
Wow oh wow oh wow! I made THE best breakfast last night.  It was so delicious this morning I had to make myself leave the table.  I've always heard people raving about the overnight french toast casseroles, but I've never had one until I experimented with my own version featuring apricots and cream cheese a few weeks ago.  It wasn't my favorite because the bottom was too done, so I tweaked my recipe a bit and tried again last night.  Oh my goodness was it delicious!

Unfortunately, we've had a house of sickies this week.  I have one with the flu (who had a flu shot, btw) and the littlest one had a UTI (aren't those fun while potty training?).  And, with all that fun, we've been staying home the past few days.  So, last night I whipped up a french toast casserole from scratch to have this morning.  I had just ran to the store yesterday, so I had fresh strawberries and cream cheese to add to it.

 photo 6ca29301-4828-4fd5-bf34-84eadef7b2e8_zps3f798135.jpg

French Toast Casserole with Strawberries & Cream Cheese

Ingredients: 
1 stick of butter, softened
1/4 cup brown sugar

8 eggs
3 1/2 cups milk or 1 1/2 cups half&half and 2 cup of milk
1 1/2  tsp cinnamon
2 tsp vanilla
3-4 tbs maple syrup
1 pkg of Pepperidge Farm Sourdough bread cut into large cubes (about 12 pieces of bread)

16 oz (2 pkgs) of softened cream cheese
1 pint or about 2 cups of fruit such as sliced strawberries mixed with 1 tbs of sugar

Topping:
1/4 cup brown sugar

 photo 1B0BC9F9-1EB5-434B-9E05-CF39DD59471A-471-0000004644DCCFB9_zps0e09f4fc.jpg


First, slice up your strawberries and add about 1-2 tbs of sugar. Mix well, then put in the fridge for a couple hours.  This will pull the water out of the strawberries and create a delicious syrupy-ness to it.  If you don't have time for that - no worries.

Take your softened butter and mix with 1/4 cup of brown sugar.  Then smear it all over the bottom of a 9 x 13 inch casserole dish.

Next, cube your bread.  I love sourdough bread, and I love how wonderfully thick and delicious this Pepperidge Farm bread is, but plain ol' sandwich bread will do in a pinch for this recipe too.  I cut mine into large cubes about 2 x 2 inches in size.  Place half the bread in the dish.

Take your cream cheese and microwave it for about 20-30 seconds.  This will turn it very smooth and a little runny and easy to smear on the bottom layer of bread.  Smear away!  Then, add your fruit.

Mix up the eggs, milk, cinnamon, maple syrup and vanilla.  Pour half the mixture onto the bottom half of the casserole.  Next, add the rest of the bread.  Pour the rest of the milk/egg mixture onto it.  Make sure you pour it so everything is evenly soaked. 

Take the 1/4 cup brown sugar and sprinkle it all around the top of the dish.

Cover with foil and put in the fridge til morning.  Or let it sit for at least an hour before baking. 

Remove from fridge.  I like to put mine on top of the oven as it warms up.  Preheat oven 375.  Bake for 45 minutes.  Then, remove the foil for the last 15 minutes or so.  Check to make sure it's not soupy in the middle.  A knife should come out clean when inserted in the middle.  Sometimes mine needs an extra 10 minutes.  It will still be a bit mushy when done because of the cream cheese.

Let it sit for about 5-10 minutes before serving.

This is also wonderful to make ahead and bake, and then serve it for breakfast on school days.

I made an earlier version with apricots and apricot preserves with the cream cheese.  It was delicious just needed something on the bottom of the pan to stop it from overcooking down there. That's why I added the butter and sugar -- which was PERFECT this time around.

However, if you'd like to use apricots, here is what I did:

I used about 1/2 cup of apricot preserves that I smeared on top of the cream cheese. Then I took a can of apricot halves, smashed them, and added those on top of the preserves.  The tanginess mixed with the cream cheese was so yummy!! I'm definitely going to make that version again.


Thursday, January 17, 2013

Dutch Oven Bread

C7E3ED4A-0D3D-4CB3-A2D5-4B492B95DD86-11278-00000692B9094C7A
I found this recipe awhile back from another blog called The Taylor House and pinned it.  Check out her blog, she has some lovely recipes. I'm going to try the slow cooker potato soup very very soon.  Apparently, this recipe goes back even further to The Merlin Menu -- which gives great pictures and steep by step instructions. 

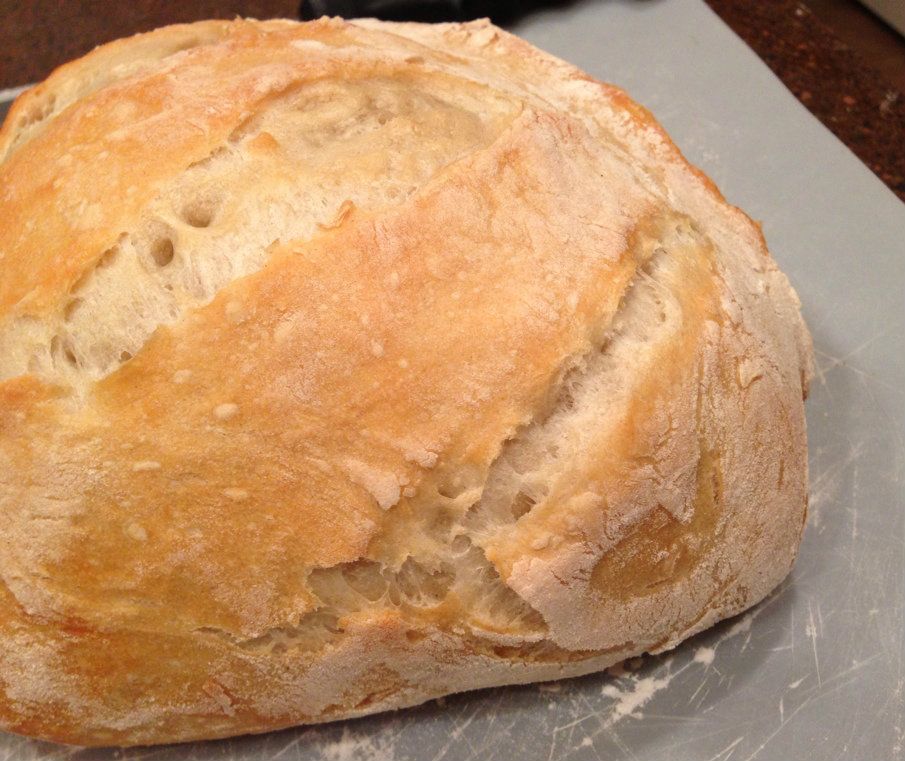
I've made this bread once before and it came out lovely.  It has this amazing hard crust.  I've found I prefer the extra effort of putting it together the night before over the peasant bread I whip up in a couple of hours. I am just so thrilled, it looks like a loaf I'd pick up at the fancy bakery.  And, it tastes heavenly.  Apparently, keeping the lid on the pan allows the steam to create that outer crust that is just wonderful. 

Tonight I made it to go along with beef stew for dinner and cut it in big chunks.  Then I used the new Land o'Lakes olive oil and sea salt butter.  Lordy, that stuff is so good, I could have probably eaten the whole loaf myself slathered in just that butter.  Yum!

I will tell you, I don't have a dutch oven or even parchment paper.  So, for me this is Roasting Pan Bread, lol.  I used my small roasting pan and just used cooking spray so it wouldn't stick. While I would love a dutch oven, I can't afford a nice one just yet -- nor I have seen one at a thrift store.  My roasting pan worked fine, so if you don't have a dutch oven, try it anyway. 

Dutch Oven Bread

  • 1 package active dry yeast
  • 1½ cups warm water
  • 1½ teaspoons salt
  • 3 cups bread flour or all-purpose flour and a bit more for dusting the bread after rising.

Instructions
  1. Dissolve the yeast in the warm water in a bowl or mixer.
  2. Add the flour and salt (in that order) and mix thoroughly.
  3. Cover the bowl with plastic wrap and let rest on a counter at room temperature at least six hours and preferably, overnight.
  4. Dust a cutting board with some flour and scrape the dough onto it.
  5. Sprinkle a bit of flour over the top as it will be very sticky.
  6. Just fold the dough over onto itself a couple of times, and shape into a ball.
  7. If the dough is too loose, just knead in ¼ cup of flour.
  8. Shape into a ball by pulling around the dough edges and folding underneath. Place on the counter on a piece of parchment paper and cover with a towel and let rise for another 1 to 1½ hours.
  9. When you are ready to bake the bread, preheat the dutch oven in the oven at 450 degrees.
  10. Carefully remove the dutch oven, take off the top, and using the parchment paper, lift up the dough ball and gently drop it into the dutch oven.
  11. Use a knife to slash 3 slits in the dough, diagonally.
  12. Cover and place back in oven.
  13. Bake covered for 20 minutes, then remove the lid and continue baking for 15 minutes until dough is browned.
  14. Remove from oven and cool for one hour before cutting.
I'll try to get my beef stew recipe up here soon.  It's super easy and quick, perfect for a slow cooker too.  


Friday, November 23, 2012

Craftsy is having a SALE!

Happy Black Friday!  I can't believe it, but I already finished one of my three kidlets Xmas gifts (Thank you, Amazon.com!).  I'm halfway done with the second one, and by Sunday, the baby's Xmas will be done too!  I've never this fast.

But, this sale would be the perfect gift for your somebody who is "crafty." For Black Friday and Cyber Monday, I just found out Craftsy is having a sale!  All their classes are $19.99 and under through Monday, even the ones that are usually $39.99! There are just so many to choose from.  I'm really wanting to try the make your own monster class.  So cute!!

I've recently signed up for the class The Art of Cloth of Dyeing.  I can't wait to get started!  I love to dye things, and I'm hoping the advanced techniques will be new things I can learn.  I have to finish a few crafty things for an upcoming craft fair before I can get started, but I just can't wait.  I'll definitely be blogging my projects in the near future. 

If you're interested in finding out more about the classes, just click this link --  Online Sewing Classes .  It will take you to the entire list of classes they offer.  And, it's not just sewing and crafty things.   Gosh, there is so much I want to take...breadmaking, cheese making, cake decorating....the list just goes on and on.

Now I'm off to the kitchen because I'm starving after thinking about bread and cheese.