My son, a self proclaimed Star Wars buff, and my "darling" husband did not like my ribbon sculpture for the last character for part 3. It wasn't good enough for them, blah, blah, blah. So, to appease the critics, I remade it. And...success! They like it and now say it looks awesome. My sweet little boy was gazing at it adoringly and said it was very cool. Yay! It was a bit hard to design. Of course, those two had lots of tips for me to make it better.
So, FINALLY, after swim team practice tonight, I will post Part 3.
Then, as soon as my new ribbons arrive, I'll be designing another book/movie trilogy ribbon sculpture.

Friday, October 19, 2012
Tuesday, October 16, 2012
Coming Soon part 3
I had planned to complete the Star Wars Ribbon Sculpture Trilogy by last night. But, that was before I had both a sick husband and toddler. So, it will probably by either tonight or tomorrow night before it is up.
On a completely different note, I just finished the first book in a YA adult trilogy called Wake by Lisa McCann. It's about a teenaged girl who gets sucked into other people's dreams when they fall asleep, even if she's wide awake. It was a really easy read, but it was very entertaining. I read it in a day and couldn't stop. I'm anxiously awaiting the second book from my request hold at the library. If you like YA, you might enjoy it too.
On a completely different note, I just finished the first book in a YA adult trilogy called Wake by Lisa McCann. It's about a teenaged girl who gets sucked into other people's dreams when they fall asleep, even if she's wide awake. It was a really easy read, but it was very entertaining. I read it in a day and couldn't stop. I'm anxiously awaiting the second book from my request hold at the library. If you like YA, you might enjoy it too.


Thursday, October 11, 2012
Princess Leia Star Wars Ribbon Sculpture Hair Clip Headband - PART 2
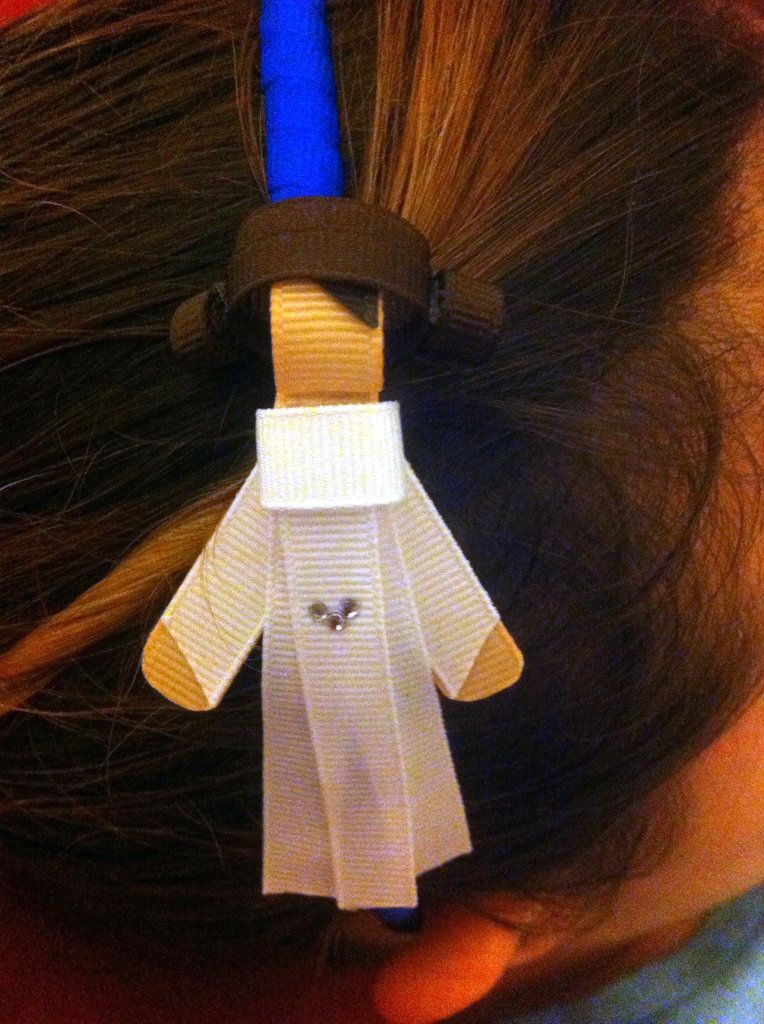
This is Part 2 of my Star Wars Ribbon Sculpture tutorial. This tutorial will show you how to make a Princess Leia ribbon sculpture hair decoration. I have it pictured both on a hair clip and on a headband, so you can see which you like better.
As in my Yoda post, I've seen tutorials that tell you to use that fray spray, but I don't like it. I prefer to seal my ribbon edges with FIRE! I usually just light a candle and run my edges close to it to seal them. I'm not good with holding a lighter. I plan to get a wood burning tool very soon to try that method.
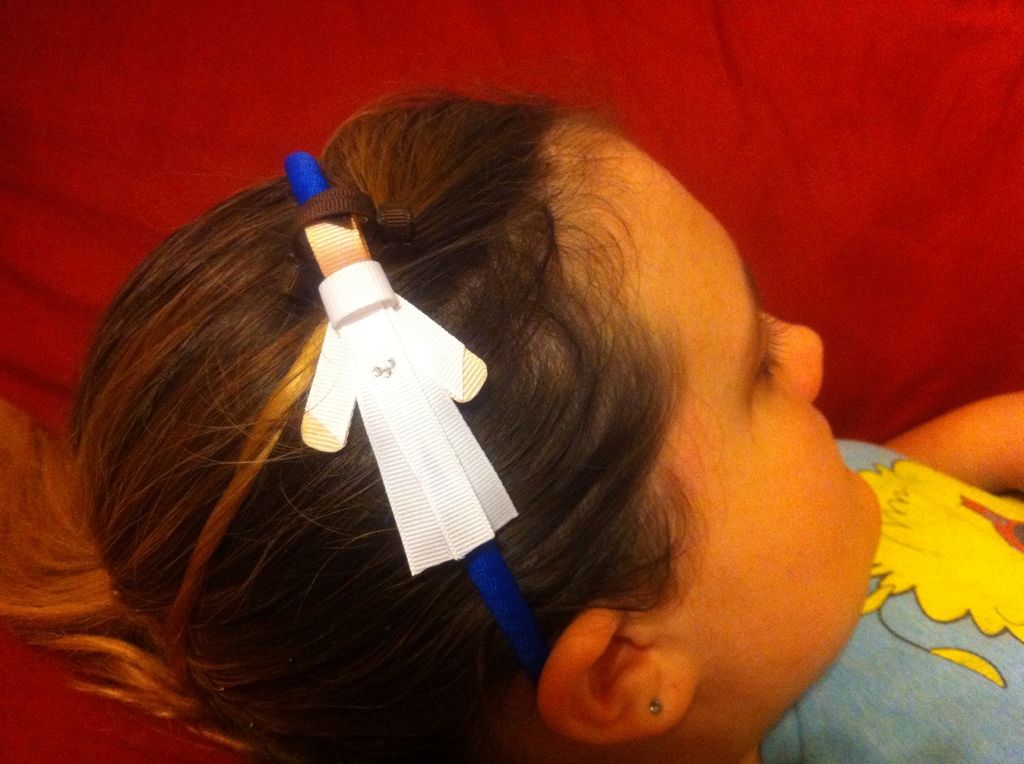
Princess Leia Ribbon Sculpture Hair Clip / Headband Tutorial
Materials:
Hot glue gun or fillet tape
Scissors
Lighter or wood burning tool to seal edges
Ribbons:
- Peach: 1 piece of 3 in, 2 pieces of 1.25 in
- White: 1 piece of 1.5 in, 2 pieces of 1.1 in, 3 pieces of 2.5 in
- Brown - 1/4 inch - 2 pieces of 4 in, 2 pieces of 2.25 in
- Brown - 3/8 inch - 1 piece of 1.1 in
Step 1 - Take the 3 inch peach ribbon and roll the top into the head and gluing.
Step 2 - Take the 1.5 inch white piece and looping it around the body as shown for the bodice. Glue it down in the back, but leave it an open loop in the front.
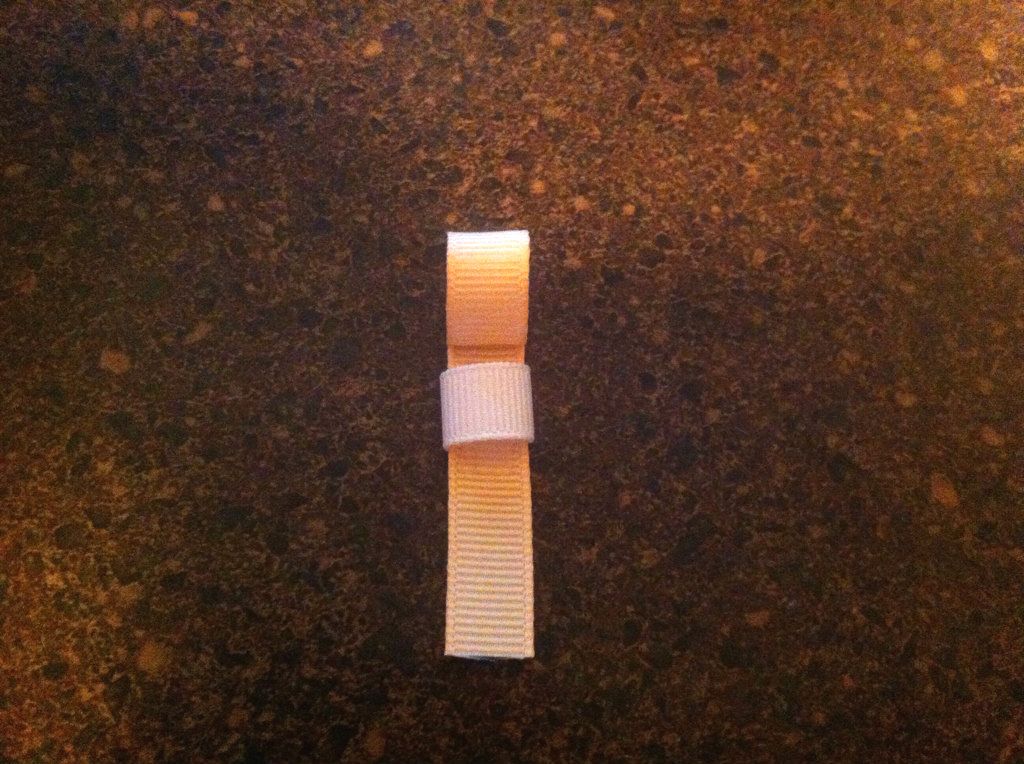
Step 3 - Take the two 1.25 in peach ribbons and round the edge of each arm and heat seal.
Step 4 - Take the two 1.1 in white ribbons, cut at diagonal and heat seal. Then, glue to the arms for sleeves, as shown.
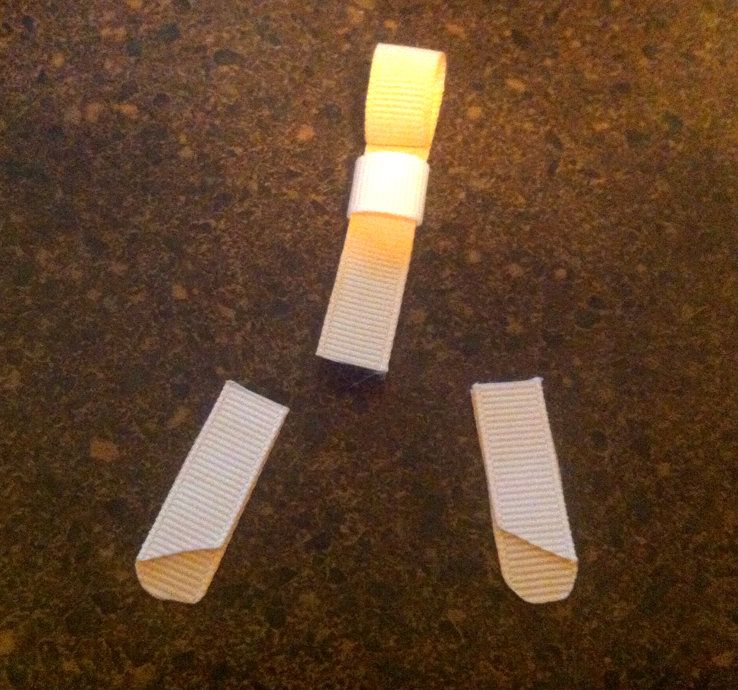
Step 5 - Glue the arms to the back of the body as shown.
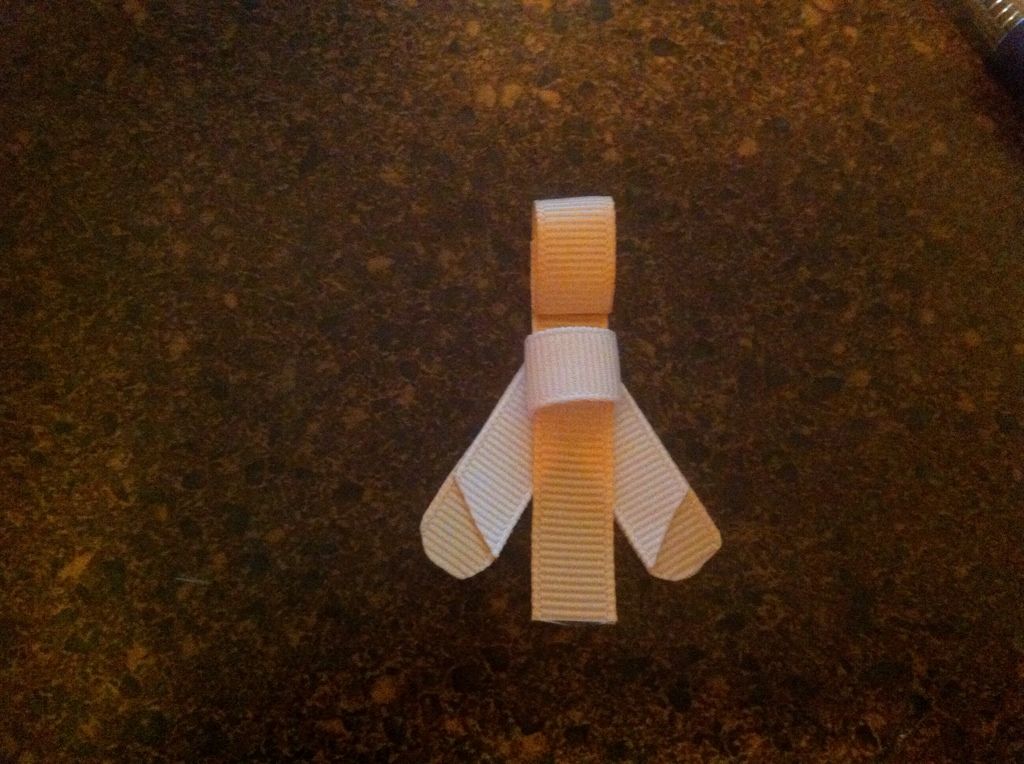
Step 6 - Take the three 2.5 inch white ribbons and glue them together so that the top is only the width of one ribbon at the very top, as shown, to create the dress.
Step 7 - Insert and glue the dress under the bodice loop, to hide the raw edges.
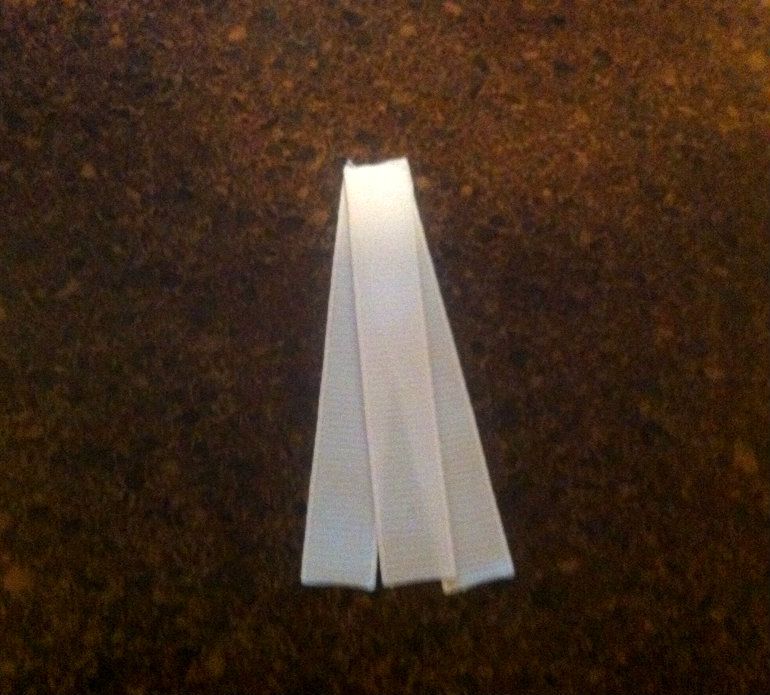
Step 8 - Take the 3/8 in brown piece and cut it at the diagonal for bangs. Heat seal the bangs, and glue it down the head.
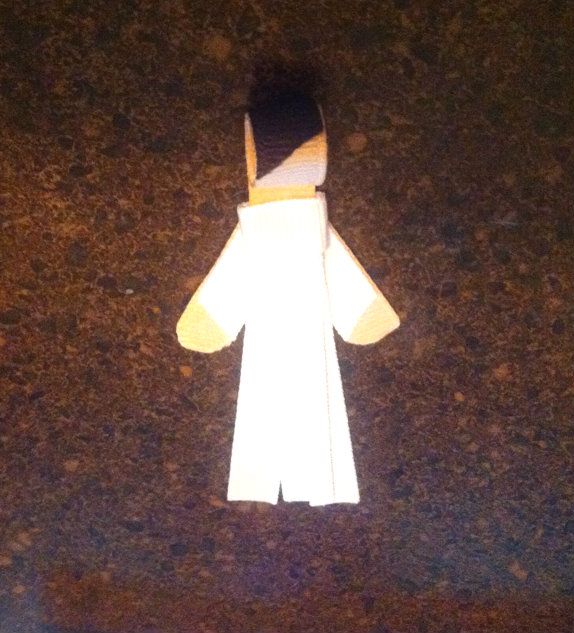
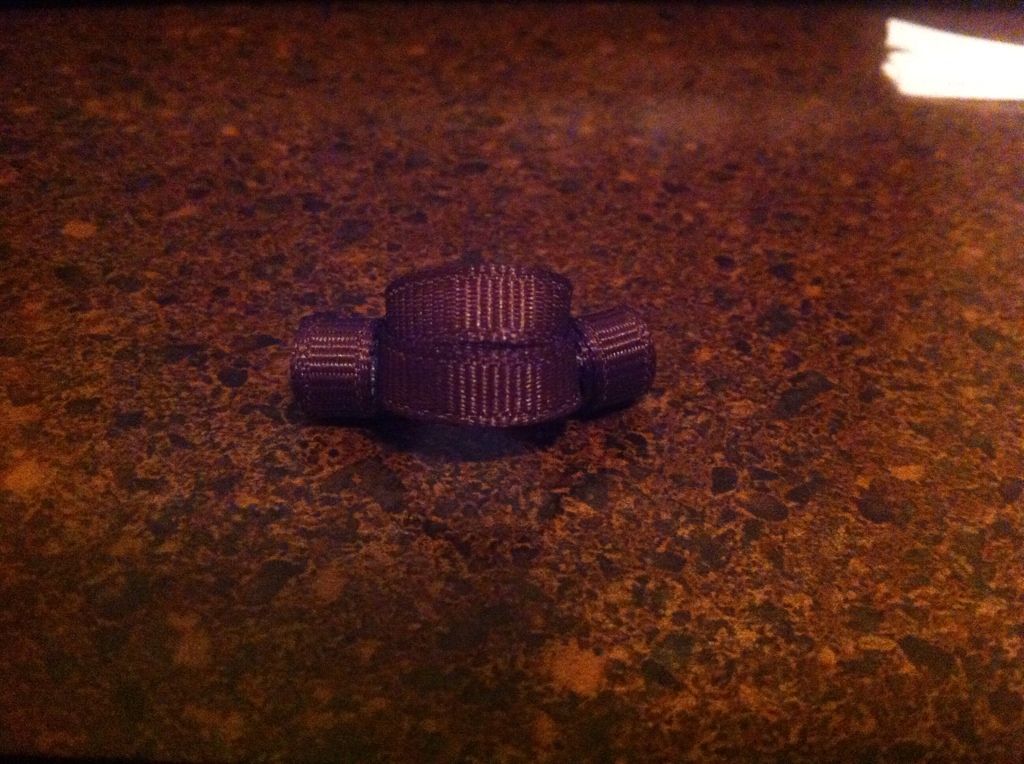
Step 9 -Take the two 2.25 inch (1/4 inch) brown ribbons and glue them as loops -- make one just slightly smaller than the other.

Step 10 - Take the loops and insert the smaller one just a bit at the back of the larger loops and glue. It should look like below. This will be the hair.
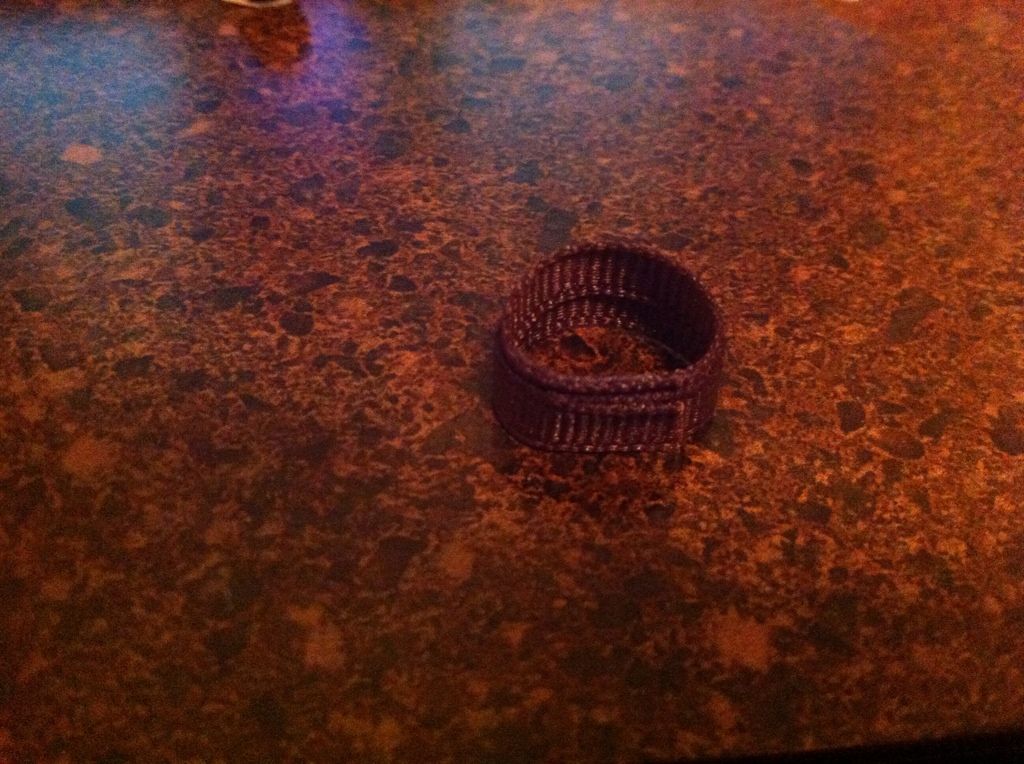
Step 11 - Take the two 4-inch brown 1/4 inch ribbons and roll each one into a roll for the "buns." Glue at the beginning and at the end to secure the roll.
Step 12 - Glue one on each side of the larger loop ribbon
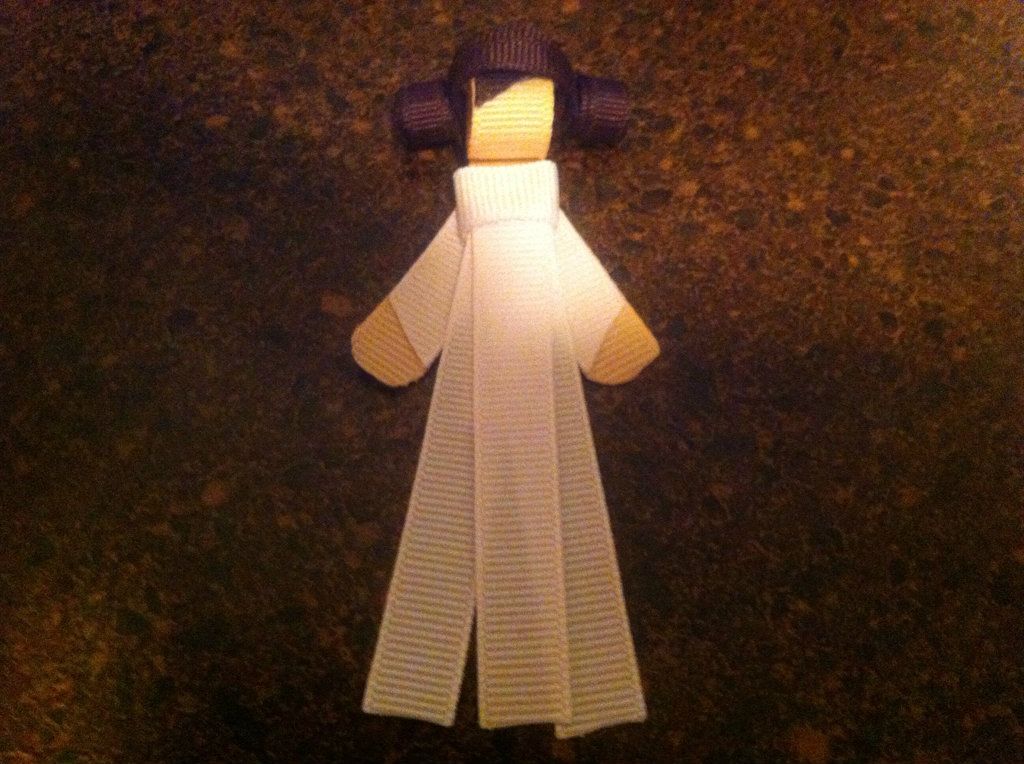
Now you're done! This is how your completed Princess Leia will look.
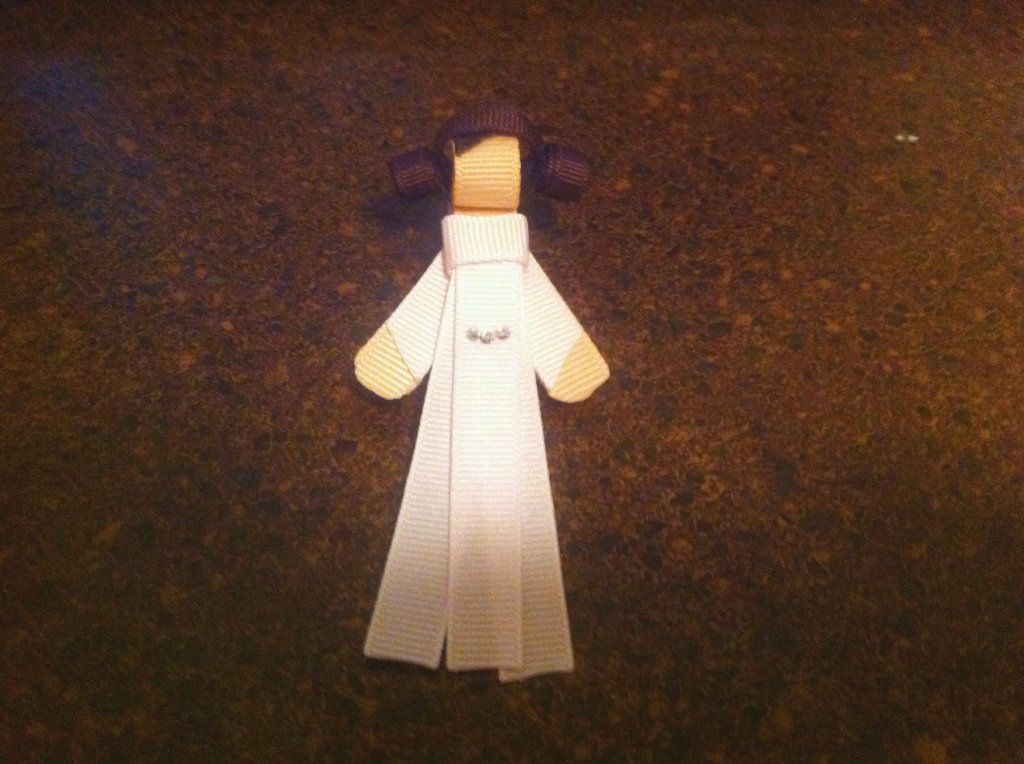
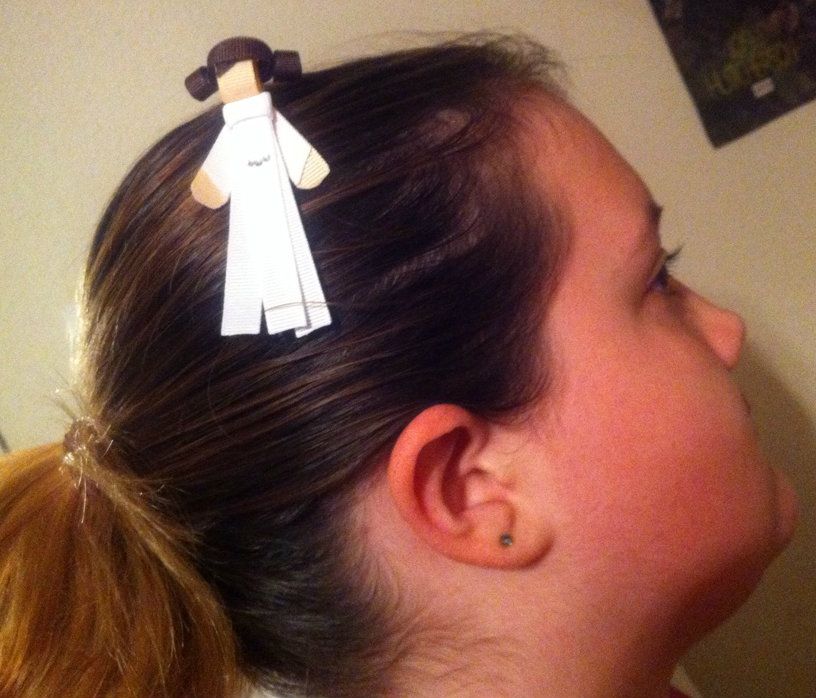
For embellishments, you can add a belt of hot fix crystals or a thin silver ribbon. Personally, I like the hot fix crystals. Here are a couple of close ups of the finished Leia.

Part 2 in the Star Wars Ribbon Hair Clip - TONIGHT!
I guess this should be known as The Empire Strikes Back of my ribbon sculpture tutorial. And at this point, my darling 13 yr old would be rolling her eyes.
Anyway, look for part 2 of my tutorial to be up tonight. See ya then!
Oh and on a completely unrelated note, by this weekend I should be "mostly" finished with my outdoor Halloween decorating and then I will make a blog post to share. I can't wait!!
Anyway, look for part 2 of my tutorial to be up tonight. See ya then!
Oh and on a completely unrelated note, by this weekend I should be "mostly" finished with my outdoor Halloween decorating and then I will make a blog post to share. I can't wait!!
Tuesday, October 09, 2012
Yoda Star Wars Ribbon Sculpture Hair Clip Headband Tutorial
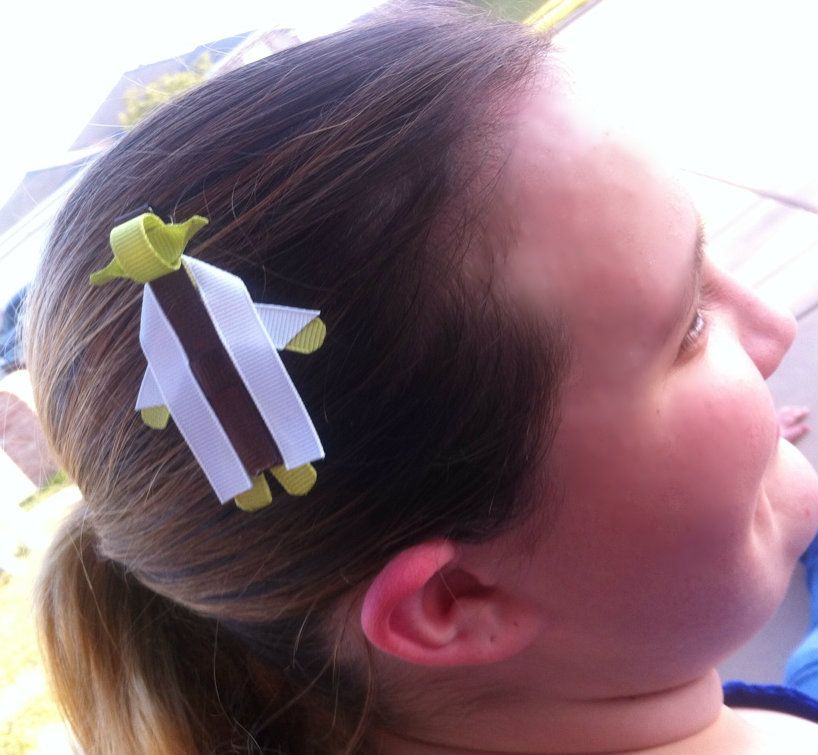 Well, believe it or not, I did make time for some blogging. While making some things for my new booth space, I decided to whip up a 3 part tutorial on some of my favorite "nerd girl" ribbon sculptures. This is part 1. There are 2 more parts coming this week from the Star Wars theme. And no, even though my children have begged, one of them is not going to be Jabba the Hut.
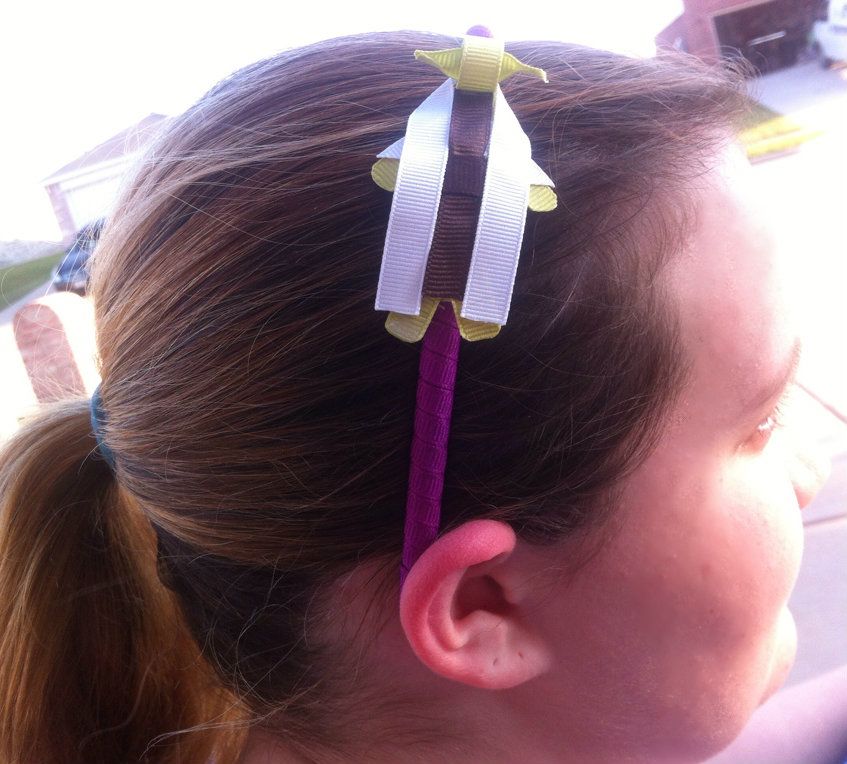
 This tutorial is to make a Yoda ribbon sculpture. I have it pictured both on a hair clip and on a headband, and both look adorable.
I've seen tutorials that tell you to use that fray spray, but I don't like it. I prefer to seal my ribbon edges with FIRE! I usually just light a candle and run my edges close to it to seal them. I'm not good with holding a lighter. I plan to get a wood burning tool very soon to try that method.
Yoda Ribbon Sculpture Hair Clip / Headband Tutorial
Materials:
Hot glue gun or fillet tape
Scissors
Lighter or woodburning tool to seal edges
Ribbons:
Light green (almost a pistachio color):
1 piece 3.5 in, 1 piece 1.25 in, 4 pieces 1.1 in/ea
Dark Brown:
1 piece 2.25 in, 1 piece 1.5 in
White:
1 piece 5 in, 2 pieces 1 in/ea
1. Take 3.5 inch green piece and roll top into head and secure with hot glue.
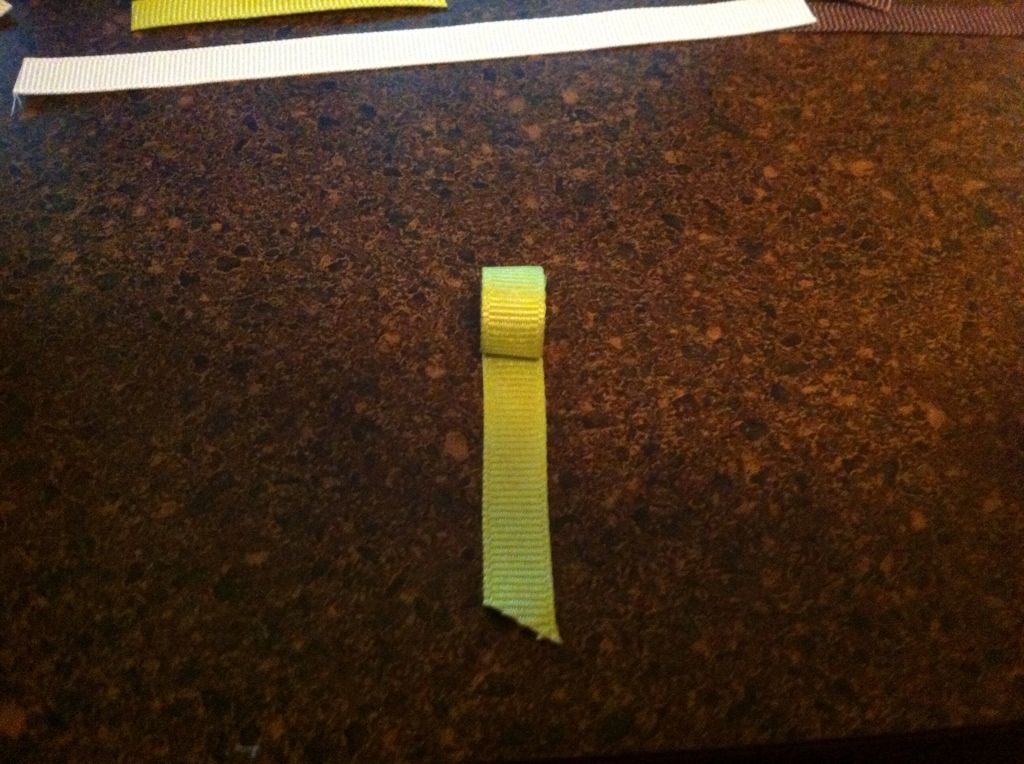
2. Take the 1.5 inch green piece, heat seal the ends, and create the ears. Glue each end down as shown.
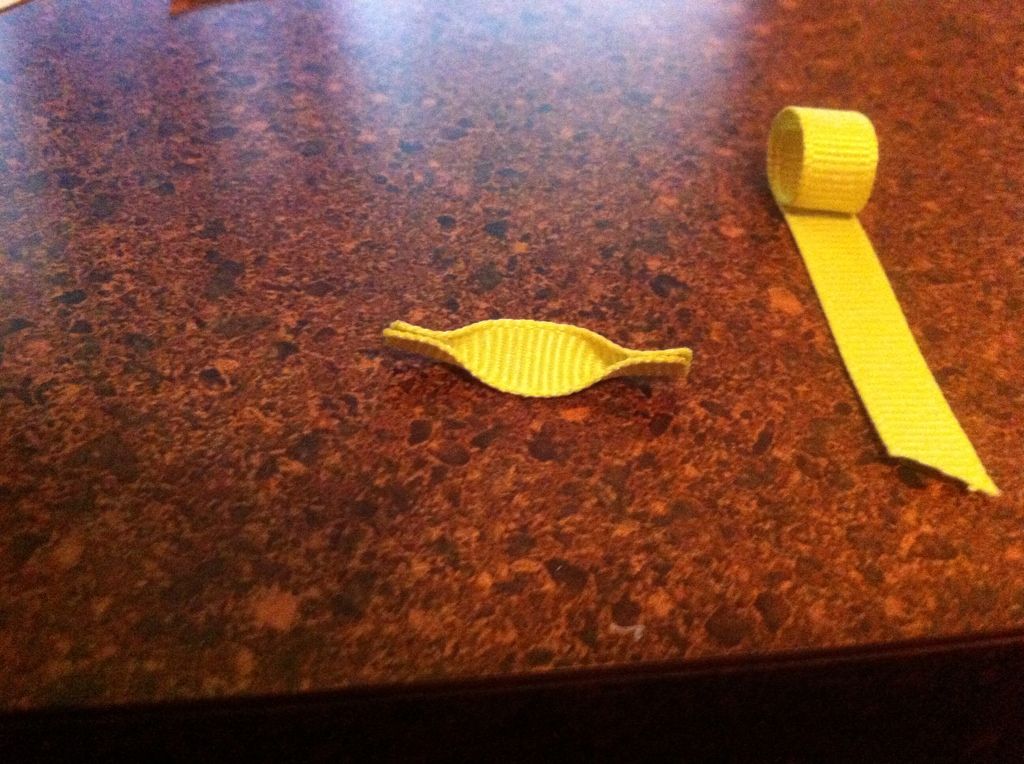
3. Insert ears into the head loop and glue to the inside back of the head loop.
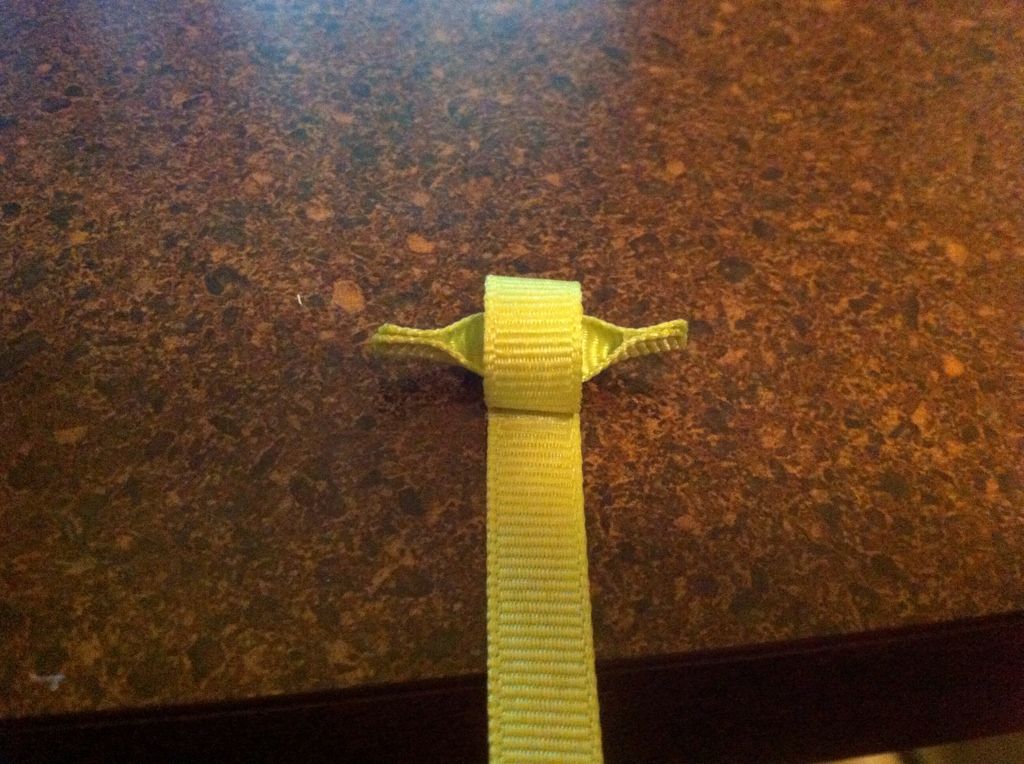
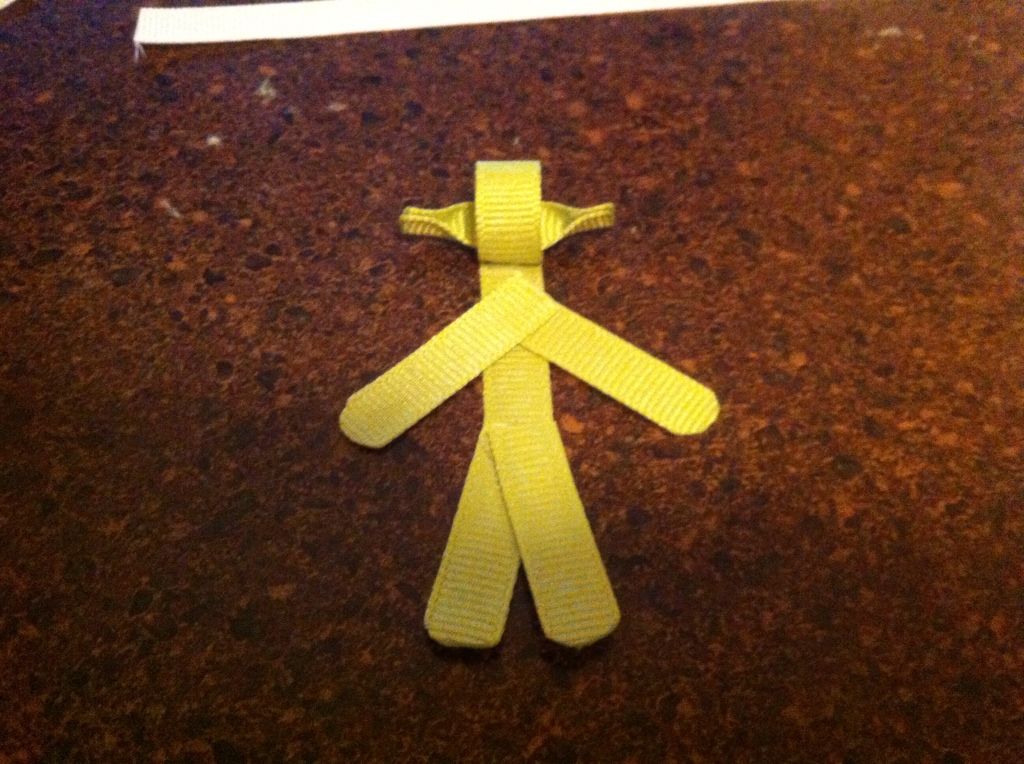
5. Take the two 1 inch white pieces and cut one end at a diagonal. Heal seal those edges and glue to the arms for sleeves.
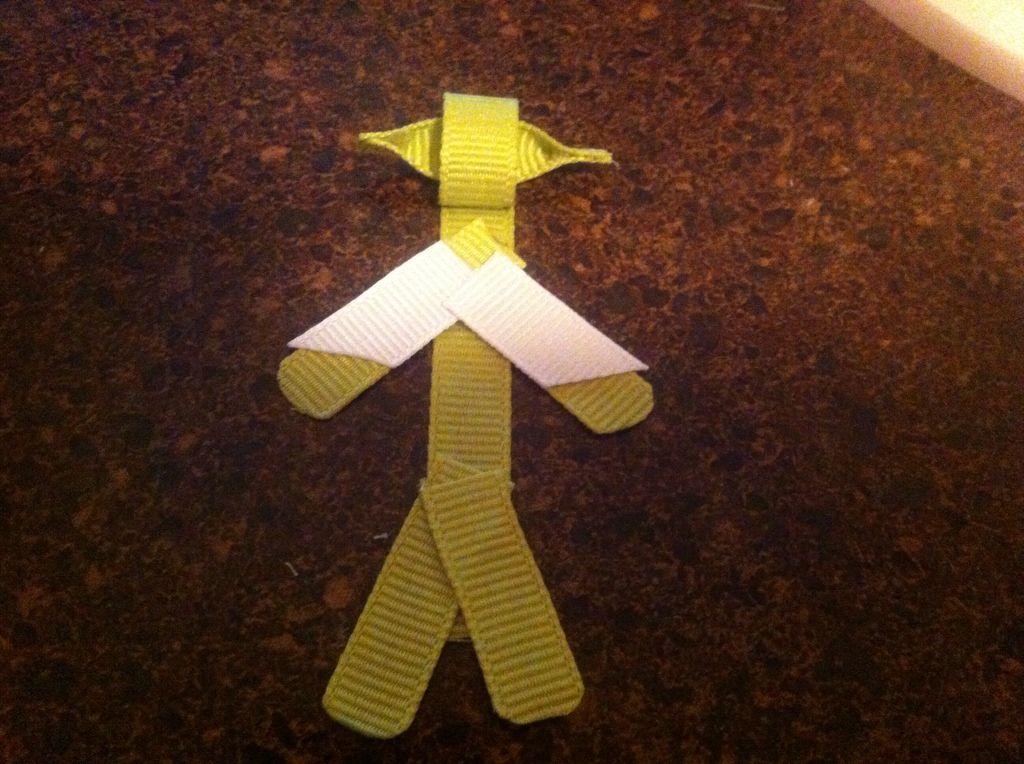
6. Take the 2.25 inch brown piece, heat seal the edges, and glue down the length of the body. I like to roll the head piece up a tiny bit and insert it right under it. If it's too long at the legs, cut it so the legs will shown, like this example. Take the 1.5 inch brown piece and glue it wrapped around to create a waist.
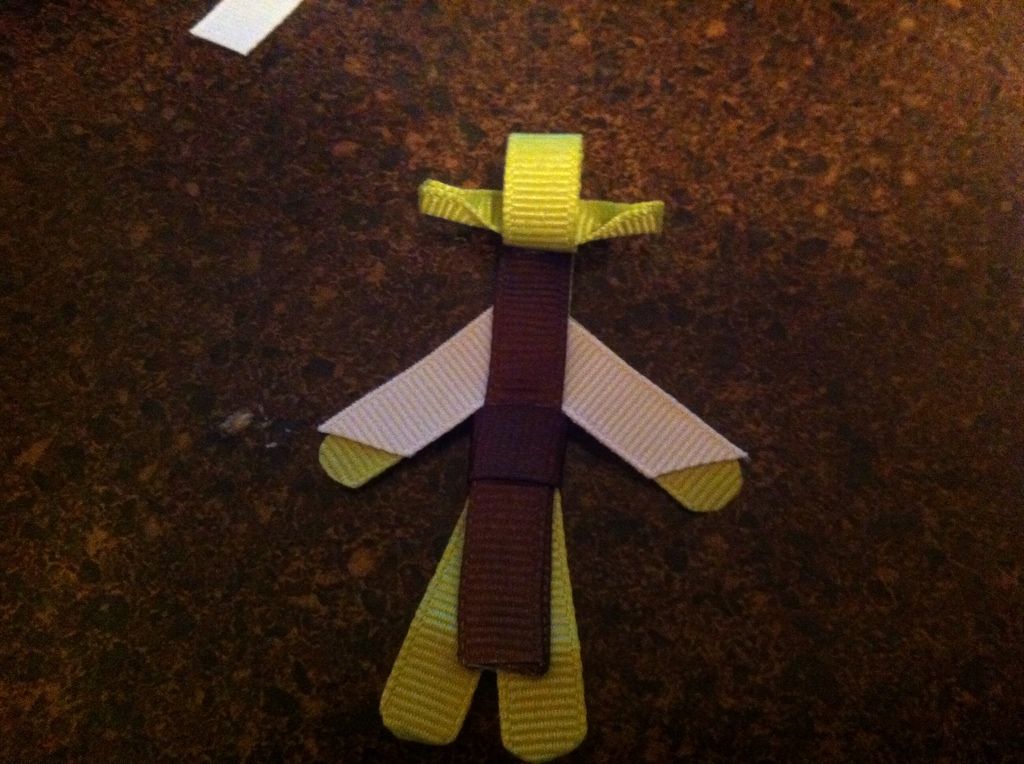
7. Create the robe. Take the 5 inch long white ribbon and find the middle of it. Glue the down the sides as shown in the picture. Leave an opening to go around the "neck" Yoda that is 3/8 inch wide. I just eyeball it and try it on Yoda before I glue it down.
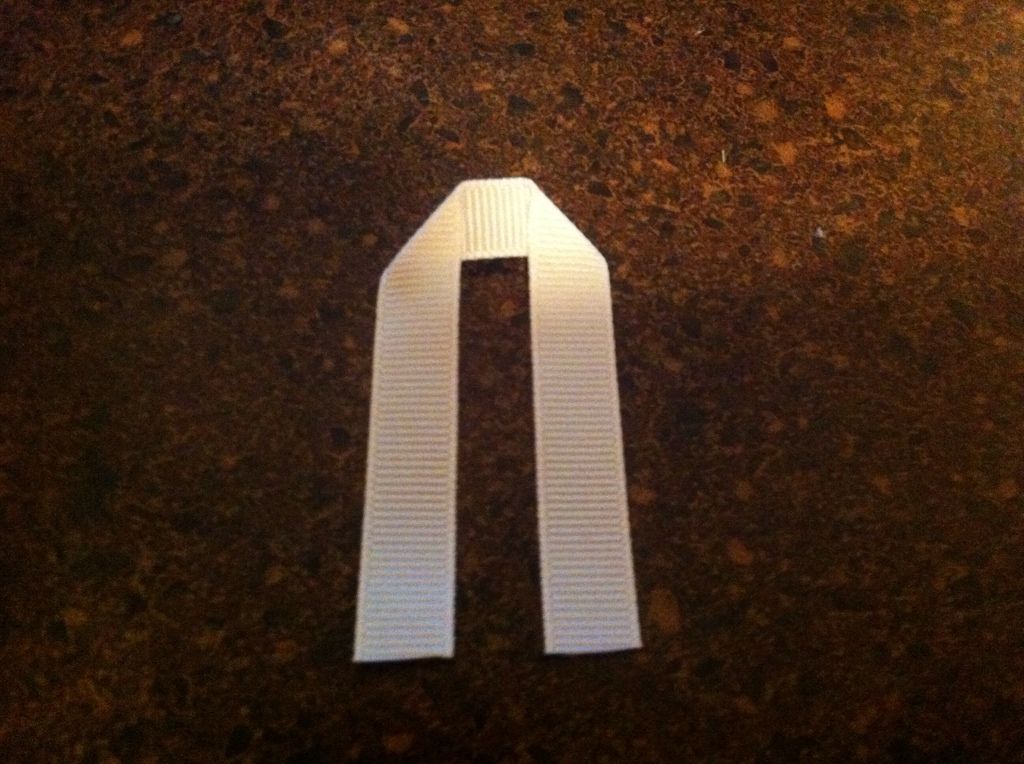
8. Heat seal the edges of the robe, then wrap it around Yoda's neck, glue it down at the arms, and at the edges of the legs that are next to the brown ribbon. Then you are done with Yoda.
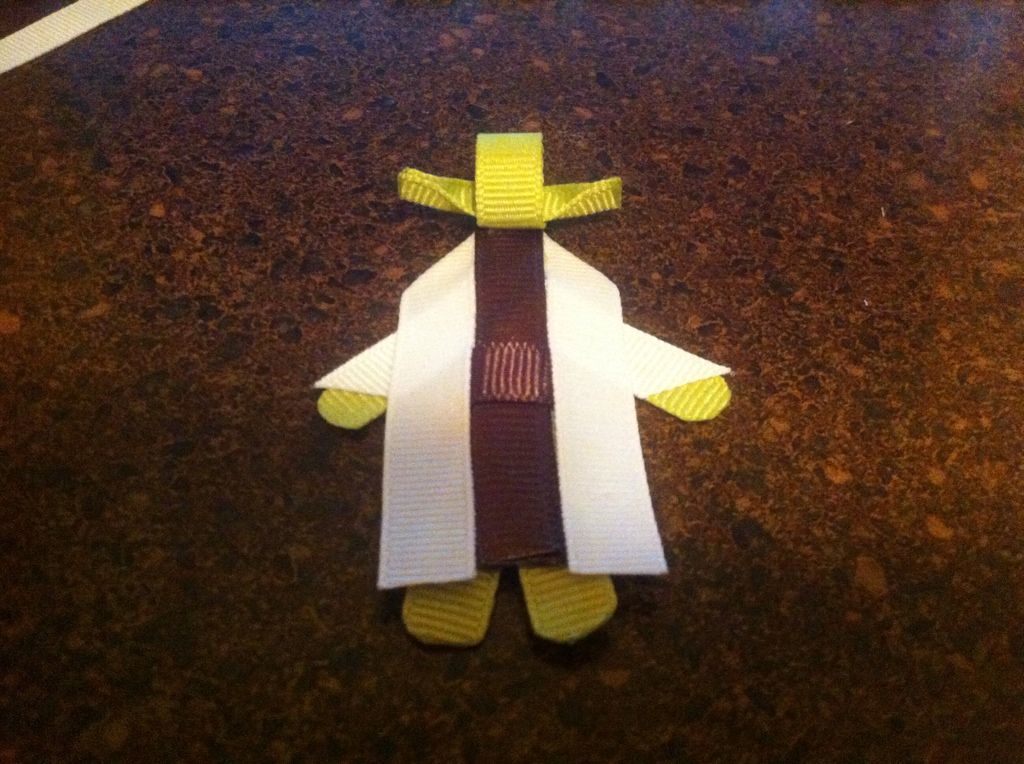
Attach to a ribbon covered alligator clip or a ribbon wrapped headband with fillet tape or hot glue.
**If you want to add a little embellishment, dip a toothpick 1/3rd in black paint and 2/3rd in green paint. Allow to dry, then hot glue into his hand for a light saber. When I write up the PDF version of this tutorial, I will include pictures of this embellishment as well.
Enjoy!




Sunday, October 07, 2012
Delicious Taco Soup with Turkey
Sorry I've been gone for awhile. Between the kids' school work, dh's in college and needing math tutoring, and sewing for my first craft fair, I decided the blog would take a back seat for awhile.
I hadn 't told you guys, but it's so exciting! My first craft fair! I was selected to be apart of this Handmade Harvest Etsy craft fair in about 4 weeks.
I'm not sure when I'll be able to get back to blogging regularly. We go all out for Halloween around here, and we have decided to go as an entire family of zombies for Halloween. So...I've got costumes to zombie-fy in addition to all my other duties.
On to the soup!
This weekend was our first big cold front. It dropped into the 50s for the highs, and we're in Texas, so that's seriously cold weather in these parts. I was getting that hankering for a warm soup or stew to fill our bellies for dinner tonight. A taco soup recipe caught my eye a few weeks ago, and I wondered how well something like that would go over with the whole family. Em hates Mexican food. The baby eats 2 bites of anything and spits out most of it, and Mr. E and dh are essentially human garbage cans. Those two will eat anything, I think, lol.
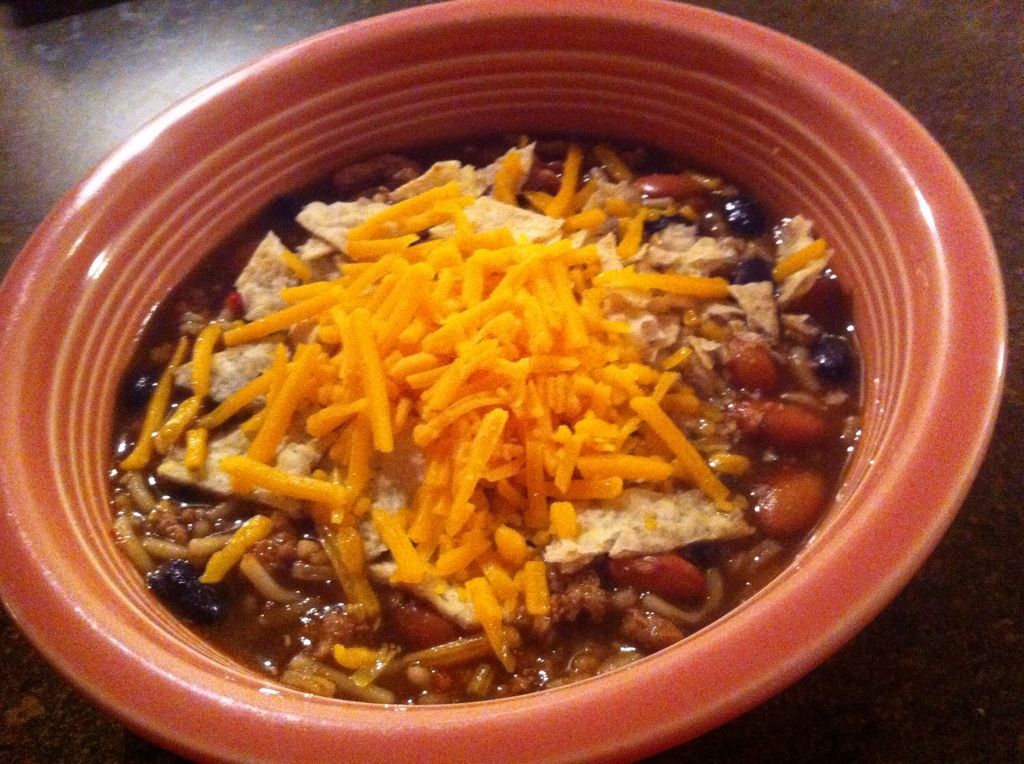 I whipped up my own recipe from things I had on hand, and OMG it was so darn good. Everyone, including the baby, cleaned their bowl. So I thought I'd share. This recipe is super easy and super quick. You can be serving it in 20 minutes.
Taco Soup
3/4 lb ground turkey (or beef)
1 cup of crushed tomatoes
1 can pinto beans
1 can black beans
1 pkg of Knorr's taco rice
6 cups of water
1/2 pkg of taco seasoning
crushed tortilla chips
shredded cheddar cheese
Opt. sour cream
Brown the turkey. Heat up the dutch oven on high and add crushed tomatoes and both cans of beans. Add the meat and stir. Next, add the package of rice. Add the water. When it starts boiling, add the taco seasoning and stir until it's all well blended. Simmer on medium until rice is tender.
I topped each bowl with crushed tortilla chips and a sprinkling of shredded cheddar cheese. I was out of sour cream, or I would have added it as well.
Mr E and dh both added taco sauce and jalapenos to their bowls for extra spiciness.
I served it with corn muffins I made from this recipe.
It was a perfect balance of spicy from the soup and sweet from the cornbread.
Two things for the cornbread recipe:
1. I didn't have buttermilk, so I added 1 tbs of lemon juice and filled up the rest of the measuring cup to 1 cup with milk.
2. Since I made muffins, it only took 15 minutes for baking while the soup was simmering (the recipe calls for 30 minutes for a pan of cornbread).
This served 5 with a bowl or two to spare for leftovers.
I hadn 't told you guys, but it's so exciting! My first craft fair! I was selected to be apart of this Handmade Harvest Etsy craft fair in about 4 weeks.
I'm not sure when I'll be able to get back to blogging regularly. We go all out for Halloween around here, and we have decided to go as an entire family of zombies for Halloween. So...I've got costumes to zombie-fy in addition to all my other duties.
On to the soup!
This weekend was our first big cold front. It dropped into the 50s for the highs, and we're in Texas, so that's seriously cold weather in these parts. I was getting that hankering for a warm soup or stew to fill our bellies for dinner tonight. A taco soup recipe caught my eye a few weeks ago, and I wondered how well something like that would go over with the whole family. Em hates Mexican food. The baby eats 2 bites of anything and spits out most of it, and Mr. E and dh are essentially human garbage cans. Those two will eat anything, I think, lol.
Taco Soup
3/4 lb ground turkey (or beef)
1 cup of crushed tomatoes
1 can pinto beans
1 can black beans
1 pkg of Knorr's taco rice
6 cups of water
1/2 pkg of taco seasoning
crushed tortilla chips
shredded cheddar cheese
Opt. sour cream
Brown the turkey. Heat up the dutch oven on high and add crushed tomatoes and both cans of beans. Add the meat and stir. Next, add the package of rice. Add the water. When it starts boiling, add the taco seasoning and stir until it's all well blended. Simmer on medium until rice is tender.
I topped each bowl with crushed tortilla chips and a sprinkling of shredded cheddar cheese. I was out of sour cream, or I would have added it as well.
Mr E and dh both added taco sauce and jalapenos to their bowls for extra spiciness.
I served it with corn muffins I made from this recipe.
It was a perfect balance of spicy from the soup and sweet from the cornbread.
Two things for the cornbread recipe:
1. I didn't have buttermilk, so I added 1 tbs of lemon juice and filled up the rest of the measuring cup to 1 cup with milk.
2. Since I made muffins, it only took 15 minutes for baking while the soup was simmering (the recipe calls for 30 minutes for a pan of cornbread).
This served 5 with a bowl or two to spare for leftovers.
Subscribe to:
Posts (Atom)


