Wednesday, January 23, 2013

Sock Baby Dolls

F20BD94C-83DC-4F1C-82D9-942D4D27E458-144-00000003C91ED776 photo F20BD94C-83DC-4F1C-82D9-942D4D27E458-144-00000003C91ED776-1_zpse96e38e7.jpg

My darling 13 year old cleaned out her room awhile back and got rid of an entire grocery sack of socks stuffed full. Some of them she hadn't even worn.  Children of the 21st century.  I feel the need to explain to her that just 100 years ago people were darning their only pair of socks.  Not only their ONLY pair of socks, they were also more than likely hand knitted by their mother and/or sisters.  

I digress.  I've been reading way TOO many dystopian teen novels lately.  

I wasn't going to wear them and neither was anyone else in the house.  I decided it was best to upcycle them into something crafty.  

Luckily for you guys, I happened to remember my phone nearby and took pictures of the process so you too can make these little sock babies.  Here is the tutorial in pictures, pretty self explanatory.  Have fun!

  photo A112768B-C011-474A-91AC-47B319CBB2C8-3735-000002B6AAF7D0CD.jpg

 photo 34D7B9B0-A562-4765-A14F-0FAB8DAE2DEE-3735-000002B6AE427B53.jpg

 photo B89DD530-56A8-4D2C-A716-EFE94467C393-3735-000002B6B17E4DA8.jpg

 photo 299C3F82-01A1-47C2-89BA-D1D9694E3395-3735-000002B6B4B7E23F.jpg

 photo 099B170F-6CEE-42B6-9A4A-74153D96975B-3735-000002B6C361F2B1.jpg

 photo A907865D-1658-4E24-8115-F3E97462FE95-3735-000002B6D4F1C6A2.jpg

 photo 0A03E597-0A4B-451B-A96F-C6D5FCB69390-3735-000002B6D07F45BD.jpg

 photo C0C9365F-B7B3-45A4-B9E3-9D14578B3834-3735-000002B6CAD67668.jpg

 photo A8BA888E-1D30-4A71-9AFE-9A5B53991D16-3735-000002B6D7ED6C21.jpg

 photo 78FBBA88-4AC9-49D0-AF97-A9B014FD6526-3735-000002B6DAB5BA73.jpg


 photo 0B0D8E4C-2383-455E-851A-6657BB1C4FFF-3735-000002B6E305C093.jpg

 photo 3A237A9C-0B46-447C-A7B1-02D447E73199-3735-000002B6F1AF0A68.jpg

 photo A14A1A67-B69C-44FB-B9EA-70A974D54D17-3735-000002B6E6158B5A.jpg

 photo 315D8A2D-1086-4BF3-9B86-B78CAC388C29-3735-000002B6DEA428A3.jpg

  photo 81667130-3E2E-423E-87B4-7983B3CCBC76-3735-000002B6EEF2D33D.jpg

 photo C1E0D7FD-BB4D-43AB-A353-4C54F1F98914-3735-000002B6F7E5473F.jpg

 photo BBA55FC8-A97A-4753-A6DA-E5F850F21007-3735-000002F1A6327F07.jpg

  photo D9599365-7F82-40FC-AA6B-22E0A668D226-3735-000002F1F08A2913.jpg


  photo F8A9C3F8-23D2-4E42-84B2-5A3F250F9603-3735-000002F243F4301A.jpg

 photo 0D00235B-3D4B-49BA-9853-6DB0D1D6A853-3735-000002B6FCF31EDA.jpg

This last step I was worried would be hard to understand in just pictures, so here is a little explanation.  After you make the little round arms and legs.  Cut off as much excess of the end of the arm/leg.  Next, place the arm/leg where you are to sew it with raw side facing the body.  Then, squish it into the body (as my finger is doing in the picture) so that you can whip stitch it against the body while hiding the raw edge.  Make sense? I hope so.  I'm not sure how else to explain. 

05535E4A-A77C-4B6C-9198-8B33E416D703-144-00000003CC00A334 photo 05535E4A-A77C-4B6C-9198-8B33E416D703-144-00000003CC00A334-1_zpsa39dcc46.jpg

Done in one episode of Fringe!

I got this idea in my head to make these little dolls. I even added arms and legs.  What does everyone in this house say? They look like snowmen.  No, no, no.  They have arms not made of sticks.  They have legs.  These are not snowmen.  My dear husband says it's the hat.  Did Frosty switch to a ski style hat instead of a black top hat in his last Xmas special?  Whatever.  Enjoy!!

AF963085-D83E-4CFF-BE3D-D13DB505E239-3735-000002B5A5627A4F photo AF963085-D83E-4CFF-BE3D-D13DB505E239-3735-000002B5A5627A4F-1_zpsfcf429d8.jpg

Friday, January 18, 2013

Homemade Pizza & Key Lime Tartlets

It has not been my intention to turn this into a food blog.  However, there are two things I do every day -- cook/bake and read books.  I don't want to ignore my blog until I have a moment between 3 kids and a husband, all of who require my constant attention for some reason, for only when I sew and/or craft.  So, I hope it's not too annoying that I write a lot of posts about food and book reviews.  And now....onto another post about food and sort of a book review :D  


I've been on a mission to make pizza better than any of the pizza places around here.  We have two mom and pop places that make delicious NY style pizza, but I'm cheap.  When I make dough for 4 pizzas for pennies versus $25 for two pizzas, I would prefer to do it myself.  So, when I found this book, I was super excited.  It's called My Pizza and it's buy Jim Lahey. I found it in the new section at the library a couple days ago.  I sat down to check it out while my youngest was playing in the awesome playroom in the kid area.  They have a giant wooden playhouse complete with puppet theater at the back of it and a wooden grocery checkout FULL of food -- in the library!  Did your library ever have that when you were a kid?  Mine certainly didn't.  A playhouse!!  We love to go play there, especially on rainy and cold days.  One of the nice things is that it's not a "quiet" library.  It is so much better than any fast food restaurant play places.  

Ok, I got off topic.  I've been looking for a good pizza crust recipe, but it seems the ones I've tried just weren't very tasty, or I just didn't know how to cook them.  The basic dough recipe in this book came out wonderful.  I made it tonight.  Well, it actually takes 18 hours to make the dough as you are supposed to make it the night before.  I settled for early this morning after I dropped off the kids at school.  I made mine in about 12 hours.  Next time I will try the 18 hour version just to see if I'm missing something.  

I love this book!  It gives all kinds of wonderful tips for how to get the pizza stone super hot in an electric oven, how to get the oven super hot so it cooks pizza super fast, and how to squish canned tomatoes to make tomato sauce for the pizza.  I used the tomato squish method tonight and everyone loved it.  I even went the fancy route and bought some really nice mozzarella cheese that was still wet and squishy for our pizzas. My husband actually said it was better than takeout!  Woohoo!!

2C338773-9DC0-4FBC-8519-AE6438F85BAE-266-00000020544299A2-1_zps0c916b94 photo 2C338773-9DC0-4FBC-8519-AE6438F85BAE-266-00000020544299A2-1_zps0c916b94-1_zps5619a07a.jpg

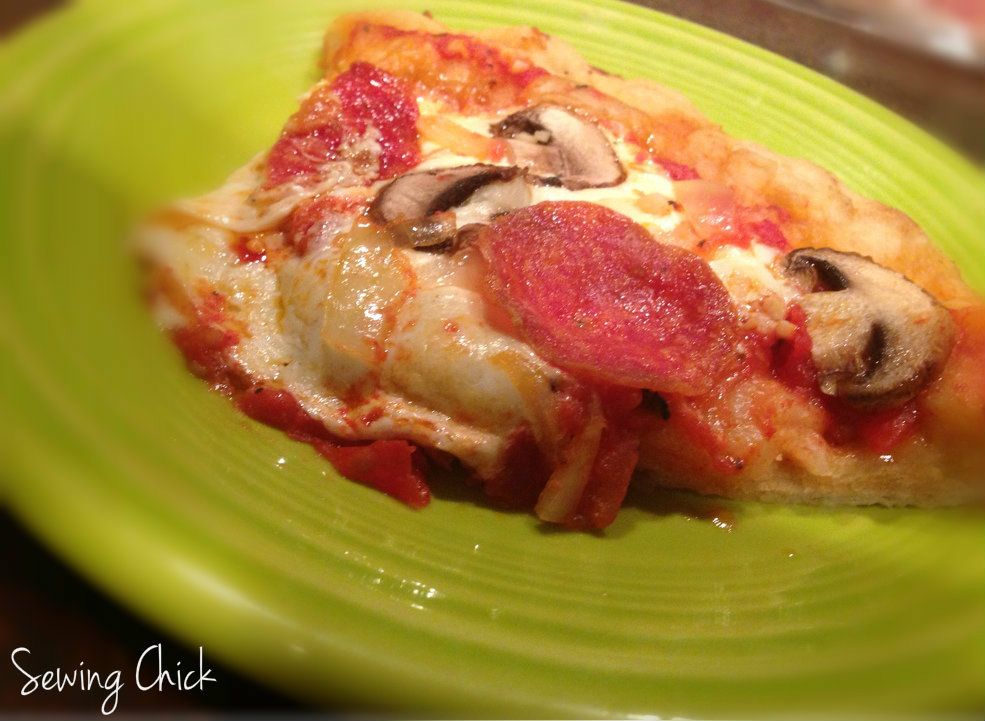
I made four pizzas out of the dough recipe in the book.  Two were plain squished tomato sauce, mozzarella cheese, and minced garlic.  I also brushed the crust with a garlic and olive oil combo.  The other two I had a mixture of my tomato sauce along with a spicy spaghetti sauce (hubby doesn't like plain tomato sauce), onion, fresh mushroom, mozzarella, and minced garlic along with the olive oil/garlic on the crust. (We are garlic-o-holics in this family. The more, the better.) I would have taken more pics of my pizzas, but unfortunately, they were inhaled before I remembered.  (Thankfully, I got smart with the tartlets and tooks pictures BEFORE I served them.)

This book is chock full of different pizza recipes much like gourmet or artisan style pizzas.  It does have basics like a marguerite style pizza, but it also goes into pizzas with bechamel sauce (white sauce) as well as other things, too.  And, I loved the pictures in this book. They are gorgeous and make you very very hungry.

From Yahoo Shine article about this very book and it's recipes: 

Jim Lahey's No-Knead Pizza Margherita

Makes four 12-inch pizzas
Making the Dough:

500 grams (17 1/2 ounces or about 3 3/4 unsifted cups) all-purpose flour, plus more for shaping the dough
1 gram (1/4 teaspoon) active dry yeast
16 grams (2 teaspoons) fine sea salt
350 grams (11/2 cups) water

1. In a medium bowl, thoroughly blend the flour, yeast, and salt. Add the water and, with a wooden spoon and/or your hands, mix thoroughly. We find it easiest to start with the spoon, then switch to your hands.
2. Cover the bowl with plastic wrap or a kitchen towel and allow it to rise at room temperature (about 72°) for 18 hours or until it has more than doubled. It will take longer in a chilly room and less time in a very warm one.
3. Flour a work surface and scrape out the dough. Divide it into 4 equal parts and shape them. For each portion, start with the right side of the dough and pull it toward the center, then do the same with the left, then the top, then the bottom. (The order doesn't actually matter; what you want is four folds.) Shape each portion into a round and turn seam side down. Mold the dough into a neat circular mound. The mounds should not be sticky; if they are, dust with more flour.
4. If you don't intend to use the dough right away, wrap the balls individually in plastic and refrigerate for up to 3 days. Return to room temperature by leaving them out on the counter, covered in a damp cloth, for 2 to 3 hours before needed.


88EEC995-24D7-4E2C-AF19-8B6487A36029-101-000000003B0A1600-1_zps93f3a38f photo 88EEC995-24D7-4E2C-AF19-8B6487A36029-101-000000003B0A1600-1_zps93f3a38f-1_zps693caf12.jpg

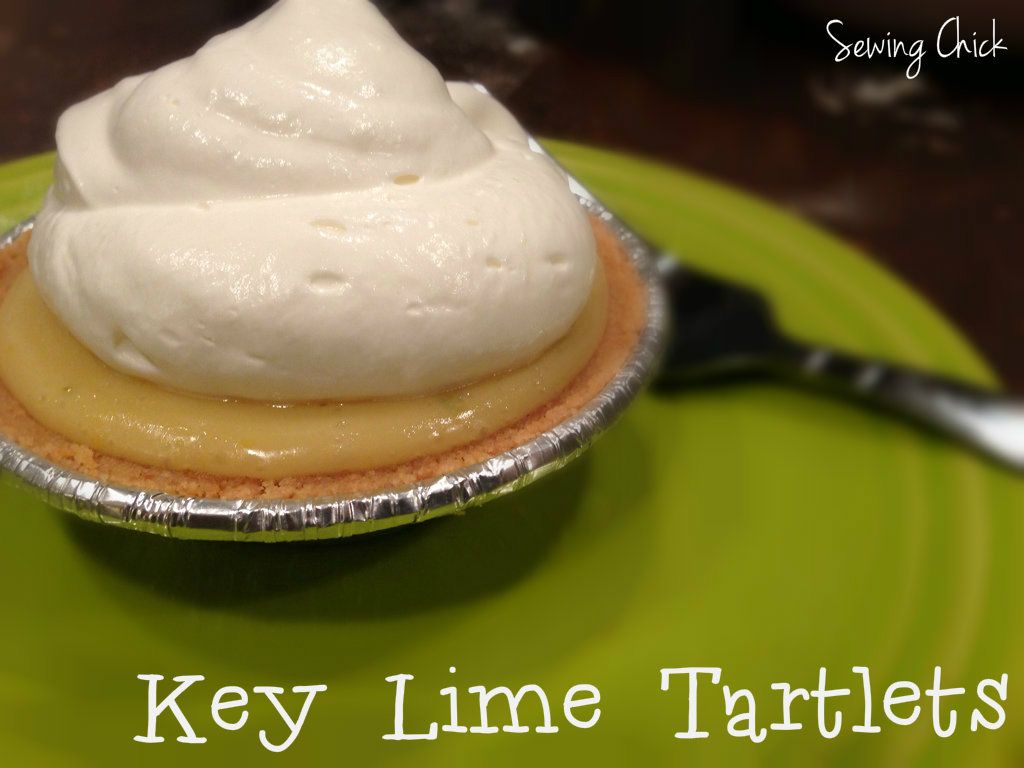
Then, I got a craving for key lime pie last night, so I decided to whip up one today for dinner.  Yesterday was Mr. E's birthday.  While I brought him lunch and had cupcakes at school, it was a swim team night, so we did not have time for a big thing at dinner.  I tried to make up for it today with delicious homemade pizza, a stop with hubby at GameStop, and key lime tartlets.  

I also got the stupid idea that instead of just buying Key lime juice already squeezed, I'd just buy 50 million key limes and squeeze them myself.  Um...not one of my brightest moments, nor was it very fun pulling out about 100 million tiny seeds before juicing them.  I think I squeezed about 25 key limes to get my 1/2 cup of lime juice.  Next time, I'm probably going to buy the juice in the bottle.  


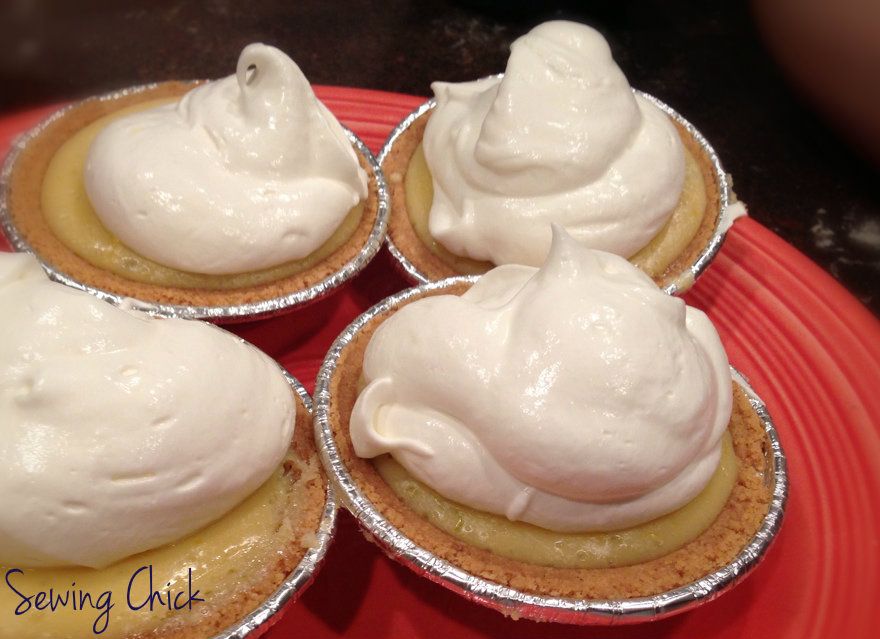
Instead of one big pie I wanted to make mini pies, so I bought these Keebler little tart shells.  They were at Walmart and very inexpensive.  It came with six tart shells, which was perfect for my recipe.  

F45C77A3-98E4-45E0-848B-E545F517E828-12079-000006FB774C7676 photo F45C77A3-98E4-45E0-848B-E545F517E828-12079-000006FB774C7676-1_zps5dd2ebe8.jpg

Key Lime Tartlets
Yields: 6 tartlets

Ingredients:
3 egg yolks
14 oz can of sweetened condensed milk
2 tsp lime zest
1/2 cup of key lime juice

Whip Cream Topping
1 cup of heavy whipping cream
1-2 tbs powdered sugar (though regular sugar will work in a pinch)

Preheat oven to 350.  Combine all 4 ingredients until smooth and well mixed.  Pour into tart shells. (I filled mine to just a tad above the shell.)  Bake at 12-13 minutes until set.  Then, chill in the fridge for 1 hour. 

When ready to serve, whip the whipping cream and sugar until peaks are formed.  Dollop a couple spoonfuls onto the tarts and serve.  

I was kind of nervous when I was investigating various recipes on how to make key lime pie.  It's very straightforward and not nearly as daunting as you might think.  I was pleasantly surprised mine came out perfectly delicious!  

My  key lime tartlets were featured over at Ladybird Ln!! How exciting!!
Ladybird Ln


Thursday, January 17, 2013

Dutch Oven Bread

C7E3ED4A-0D3D-4CB3-A2D5-4B492B95DD86-11278-00000692B9094C7A
I found this recipe awhile back from another blog called The Taylor House and pinned it.  Check out her blog, she has some lovely recipes. I'm going to try the slow cooker potato soup very very soon.  Apparently, this recipe goes back even further to The Merlin Menu -- which gives great pictures and steep by step instructions. 

I've made this bread once before and it came out lovely.  It has this amazing hard crust.  I've found I prefer the extra effort of putting it together the night before over the peasant bread I whip up in a couple of hours. I am just so thrilled, it looks like a loaf I'd pick up at the fancy bakery.  And, it tastes heavenly.  Apparently, keeping the lid on the pan allows the steam to create that outer crust that is just wonderful. 

Tonight I made it to go along with beef stew for dinner and cut it in big chunks.  Then I used the new Land o'Lakes olive oil and sea salt butter.  Lordy, that stuff is so good, I could have probably eaten the whole loaf myself slathered in just that butter.  Yum!

I will tell you, I don't have a dutch oven or even parchment paper.  So, for me this is Roasting Pan Bread, lol.  I used my small roasting pan and just used cooking spray so it wouldn't stick. While I would love a dutch oven, I can't afford a nice one just yet -- nor I have seen one at a thrift store.  My roasting pan worked fine, so if you don't have a dutch oven, try it anyway. 

Dutch Oven Bread

  • 1 package active dry yeast
  • 1½ cups warm water
  • 1½ teaspoons salt
  • 3 cups bread flour or all-purpose flour and a bit more for dusting the bread after rising.

Instructions
  1. Dissolve the yeast in the warm water in a bowl or mixer.
  2. Add the flour and salt (in that order) and mix thoroughly.
  3. Cover the bowl with plastic wrap and let rest on a counter at room temperature at least six hours and preferably, overnight.
  4. Dust a cutting board with some flour and scrape the dough onto it.
  5. Sprinkle a bit of flour over the top as it will be very sticky.
  6. Just fold the dough over onto itself a couple of times, and shape into a ball.
  7. If the dough is too loose, just knead in ¼ cup of flour.
  8. Shape into a ball by pulling around the dough edges and folding underneath. Place on the counter on a piece of parchment paper and cover with a towel and let rise for another 1 to 1½ hours.
  9. When you are ready to bake the bread, preheat the dutch oven in the oven at 450 degrees.
  10. Carefully remove the dutch oven, take off the top, and using the parchment paper, lift up the dough ball and gently drop it into the dutch oven.
  11. Use a knife to slash 3 slits in the dough, diagonally.
  12. Cover and place back in oven.
  13. Bake covered for 20 minutes, then remove the lid and continue baking for 15 minutes until dough is browned.
  14. Remove from oven and cool for one hour before cutting.
I'll try to get my beef stew recipe up here soon.  It's super easy and quick, perfect for a slow cooker too.  


Monday, January 14, 2013

Preschooler Busy Bags

A long, long, time ago, in a galaxy far away I was a member of this cool website called Swap Bot.  When I left my husband I completely forgot about it.  I had no access to my former email and with all the things going on, it just slipped away.  I came across it recently again and decided I'd give it another try.  I signed up for a Preschool Busy Bag swap.

3CF0D2DF-D9FA-47BD-B104-0FD8AEFFA260-7098-0000040F69EEB714Busy bags are basically ziplock bags of fun for your child, that have everything in the bag to do the activity.  Prior to the swap, I had never heard of these and had to google them. They looked like so much fun, I decided to join the swap. I go volunteer at Mr E's school and I always bring a bag of fun stuff for Miss Molly.  I thought busy bags would be extra fun for her to play with while I'm doing projects or copies for the teachers.

Our theme for the bags was "winter," but I found this wonderful little cupcake busy bag instructions at Money Saving Mom's blog.  To keep it winter, I tried to stick with "winter" colors like blues and whites and sparkly felt.

If you want to make your own, it costs little of nothing.  Hobby Lobby has felt sheets for 4 for $1, 4 is enough for one busy bag, plus raid your own pantry for a large ziplock and a couple of small ziplock bags for the sprinkles and big toppings.  I added a glue stick to each bag, but these can easily be done without glue sticks so you can use them over and over.  Then print off the instructions from the link above and create your own.

0FA74F3E-E45E-48BF-A20A-863E7A65030A-7098-0000040F77A56BEE-1_zpsdfe22fe4

Saturday, January 05, 2013

Review: Shadow of Night


Shadow of Night
Shadow of Night by Deborah Harkness

My rating: 5 of 5 stars


I just finished reading Shadow of the Night. While I enjoyed A Discovery of Witches, it started out great but the Diana/Matthew relationship felt a bit Twilight-esque. I was just annoyed with the whole damsel in constant distress is saved by big vampire man.

Well, this book was a complete turnaround. Diana was strong and didn't need saving, she managed herself. I love Elizabethan historical fiction so that just added to a great story. You just felt like a fly on the wall with such vivid descriptions.

I loved this book. In fact, I've been reading it nearly nonstop for the last couple of days and when I finished tonight, I had to keep reminding myself I was no longer in this magical world of witches, vampires, and daemons.

Don't you love it when you get so deep into a book that once you pull yourself out of it, you have to sort of wake up and realize it's not real life?

I can't wait for book 3!!


View all my reviews

Wednesday, January 02, 2013

Cream Cheesy Mashed Potatoes

Dear god my mother made these for our "After Christmas" Christmas dinner, and I literally died and went to heaven.  I have never tasted mashed potatoes so good in my life.  Even my 2 year old, who has hated any mashed potatoes I've ever made (and I make good mashed potatoes), ate and ate and ate these potatoes.

They have two secret ingredients - lots and lots of butter and cream cheese! My mother requested they be named for her, so henceforth, these amazing mashed potatoes (which can be made a day ahead of time) will be named Mary's Cream Cheesy Mashed Potatoes.

Also, I usually whip my potatoes, but we used a masher with these and there were NO lumps.  Just make sure you cook your potatoes long enough and the lumps will melt away as you mash.

F905D112-209C-48D2-B2D1-37D0036B5500-1056-00000074EDC8E5FC

Mary's Cream Cheesy Mashed Potatoes
4 lbs peeled and cut potatoes
8 oz pkg of cream cheese
1 stick of butter
1/2 to 1 cup of half and half

Peel and cut up potatoes into fourths.  Boil for about 25-30 minutes until they are done.  When I can slip a knife through one of the potato pieces like butter, they're done.

Drain the potatoes.  Next, mash the heck of them.  Slice up an entire stick of butter and add to the potatoes and keep mashing.  Next, add an entire 8 oz pkg of cream cheese.  We added it in whole and it melted just fine.  Next, add the half and half until the potatoes are fluffy.  If you're going to bake these, add enough half and half to make them a teensy bit soupy so they won't dry out while baking.  Add salt and pepper to taste -- we probably added about a 1 tsp of both.  You can also add Lawry's Seasoning Salt, but we forgot that step and they still tasted heavenly.

Lastly, I think this step is optional because they tasted so good before we put them in oven.  Bake at 350 for 15-20 minute.

If you make them up a day or so before, take them out of the fridge an hour or two beforehand, then add several pats of butter on top and bake at 350 for 30 minutes.

Seriously, if you don't try these you will never know what heaven is like.